1.Practical implementation
First: Infrastructure Setup
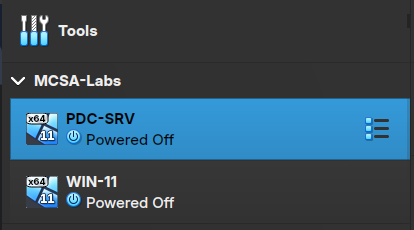
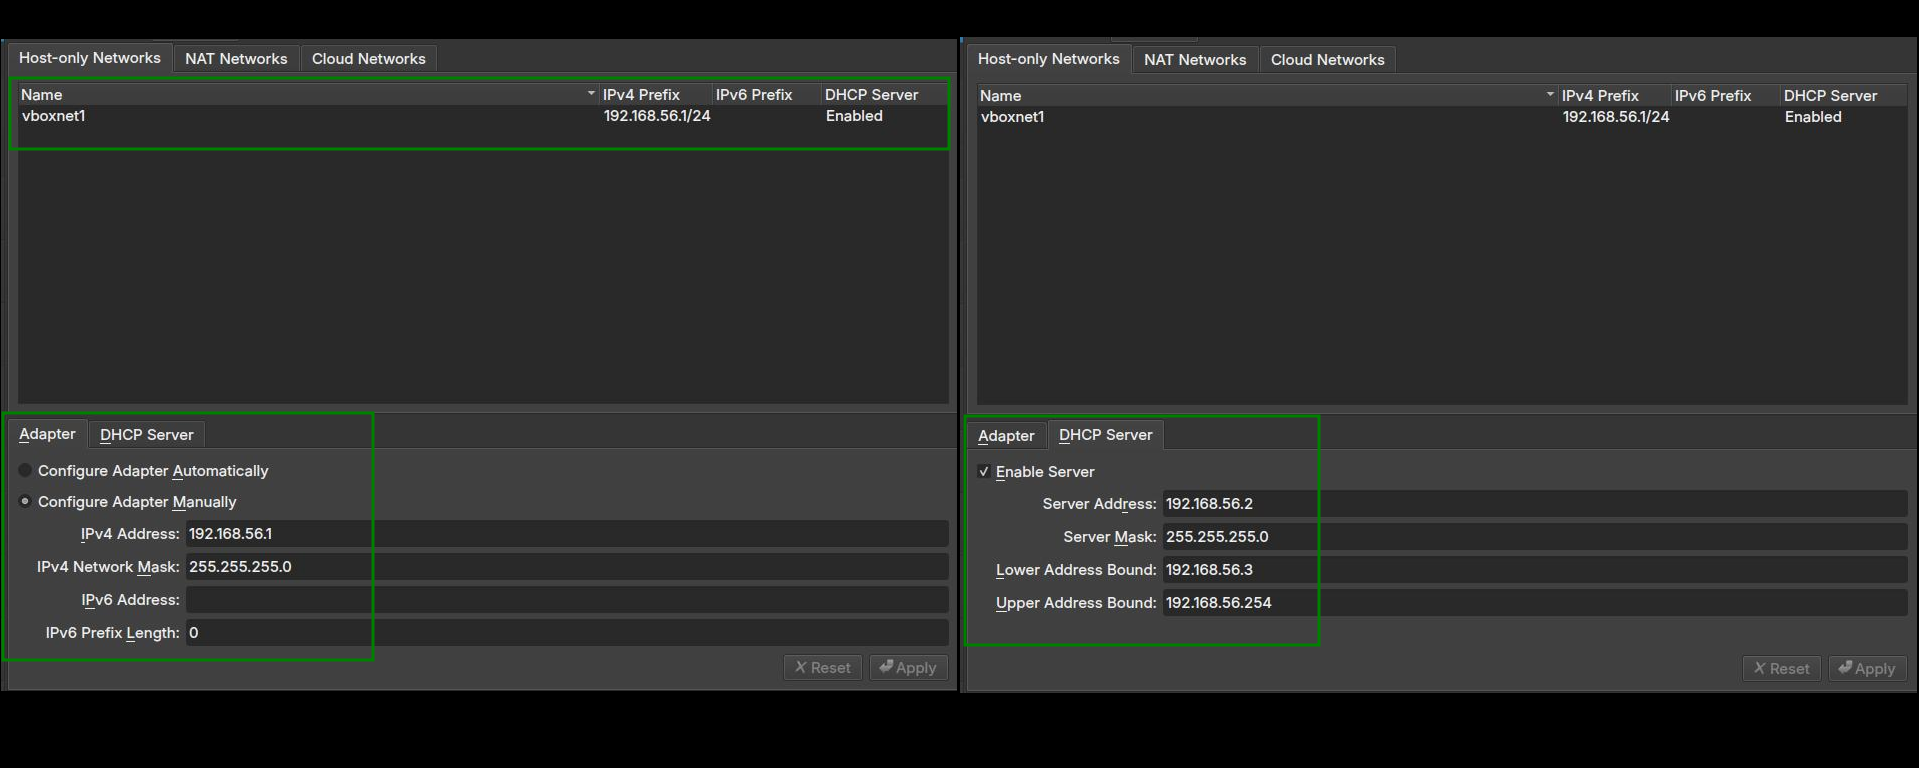
Setting up the virtual network in VBOX:
From file -> Tools -> Network Manager :
Installing Windows Server:
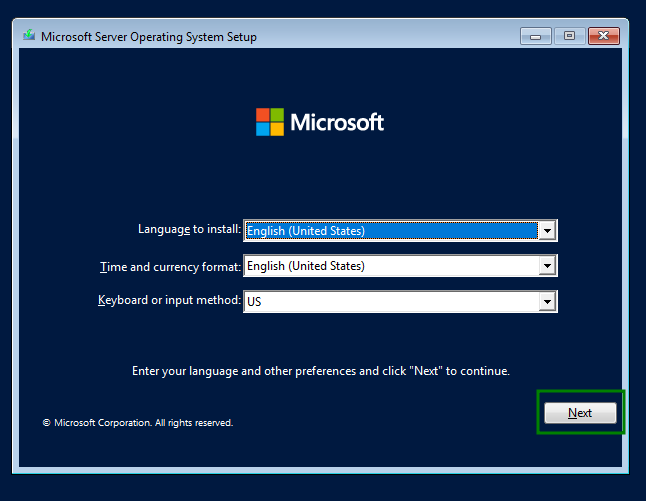
Select the language, time format, and input method before proceeding.
After that, a tab will appear with "Install Now"
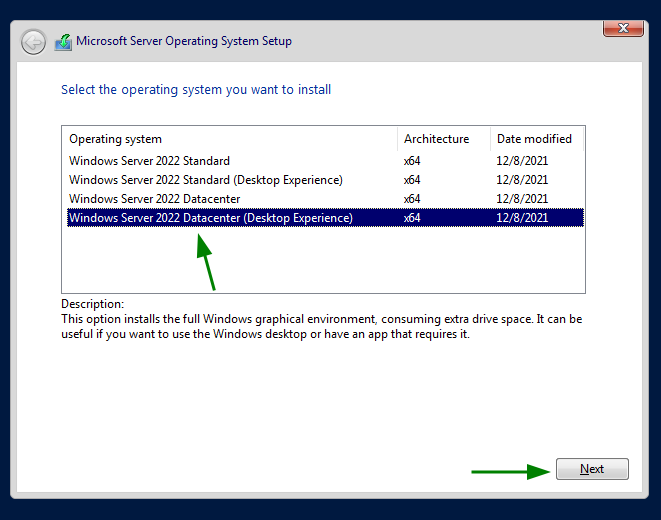
Select the "Datacenter (Desktop Experience)" option which includes a full graphical interface.
It is preferred to choose Datacenter (Desktop Experience) if you need to run an unlimited number of virtual machines (VMs) with a full graphical user interface (GUI) to simplify management and installation of desktop-required applications.
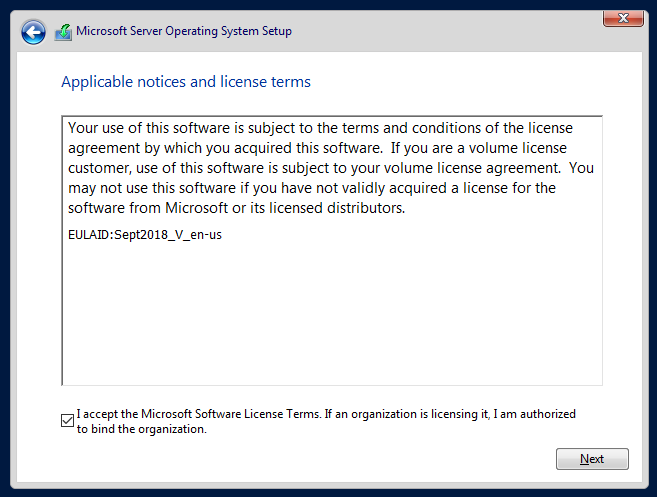
"License Terms" which is a legal step that requires accepting the Windows usage agreement before starting the installation process.
Enable "I accept the Microsoft Software License Terms" at the bottom, then click Next; without this approval, the setup wizard will not allow you to proceed to the disk partition step.
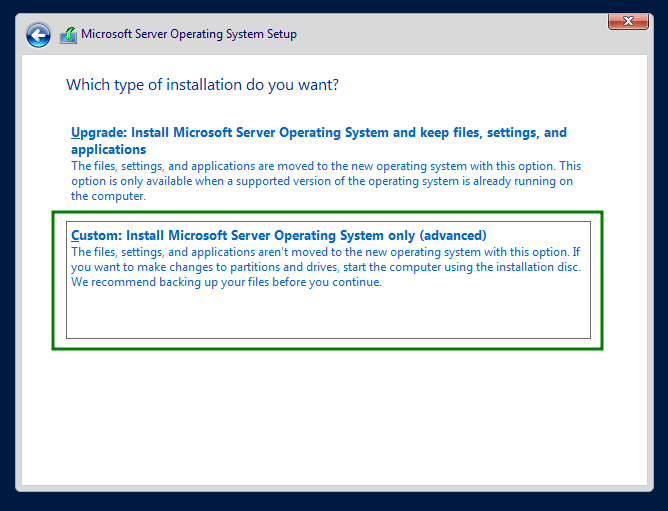
Option "Custom: Install Microsoft Server Operating System only (advanced)".
This option is most suitable when installing the system for the first time (Clean Install) or inside a virtual environment (VM), as it gives you full control over disk partitioning and space allocation, unlike the "Upgrade" option which is only used to update an existing installation.
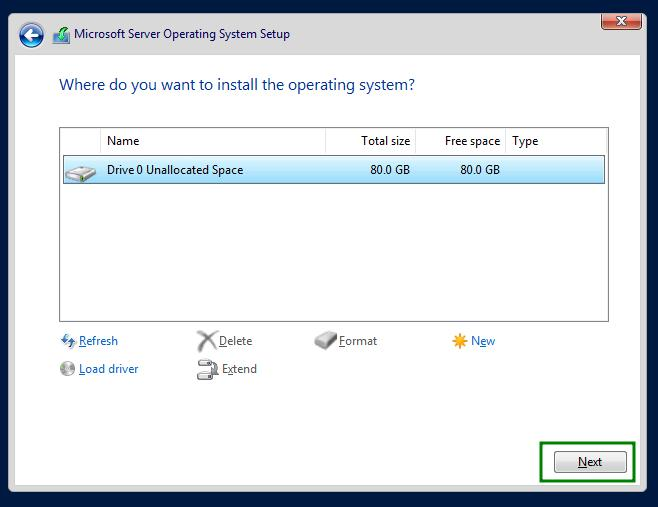
Select the installation location where an empty 80 GB unallocated space appears on the disk.
You can simply click Next and the system will automatically create the required partitions, or click New if you want to divide the 80 GB into multiple drives (such as C and D) before starting.
After that, it will continue installation and restart automatically, then this screen will appear:
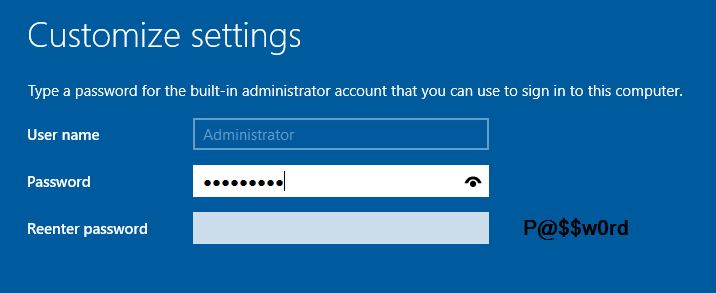
This is the most important security step in the installation, where you must set a strong password and confirm it; since you are working in your own lab, it is recommended to use a password you can easily remember (like the one shown in the image) because you will need it every time you log in to manage the server.
In VM Select :
- Ctrl + Alt + Del
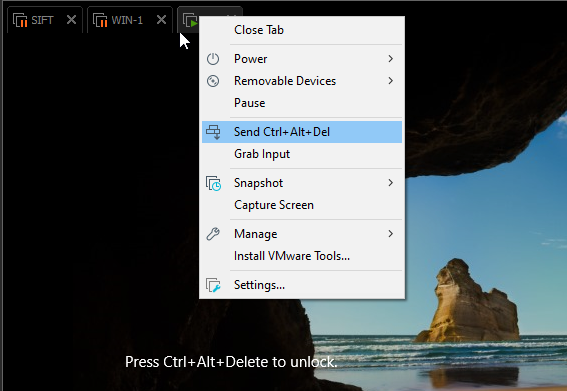
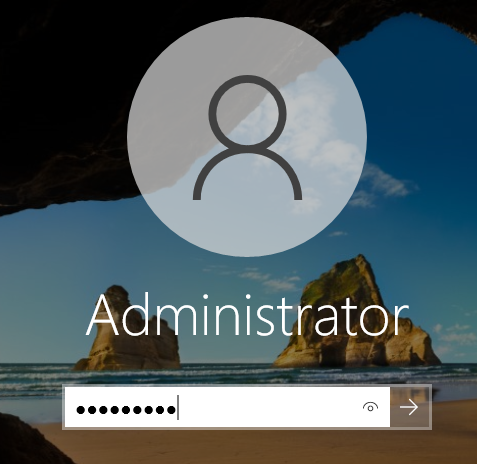
✅ Windows Server has been installed
Install VMWare Tools Or VBox Tools :
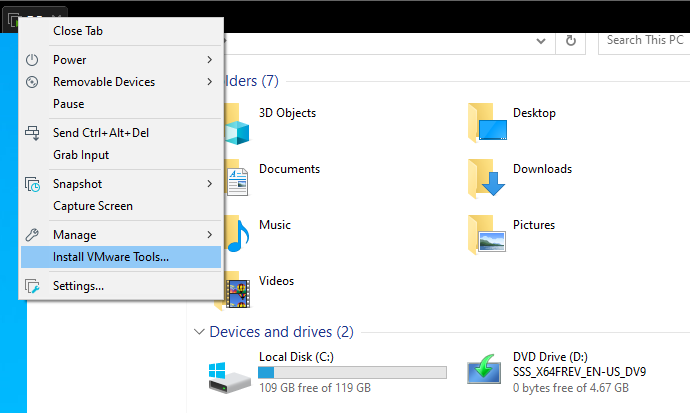
Then :
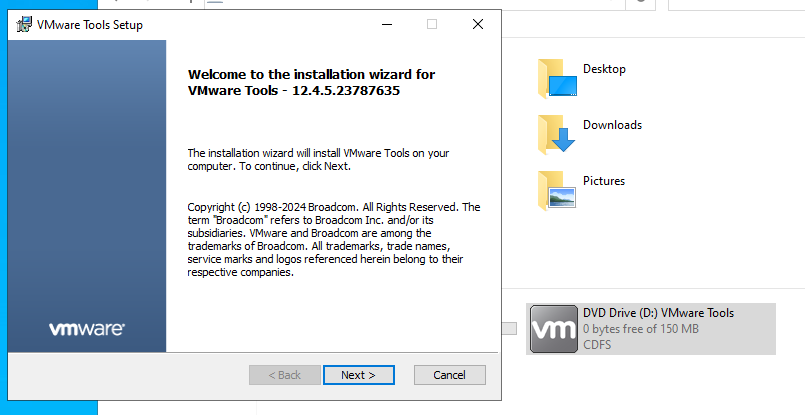
Then :
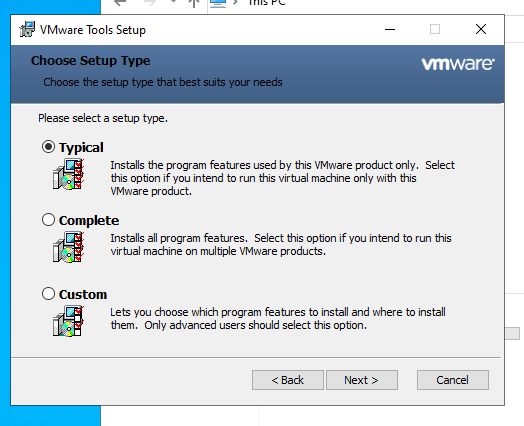
And Next => Next => Then Reboot/ Restart
✅ V.... Tools is done
Creating the Domain (Domain Controller):
I will change the server name first:
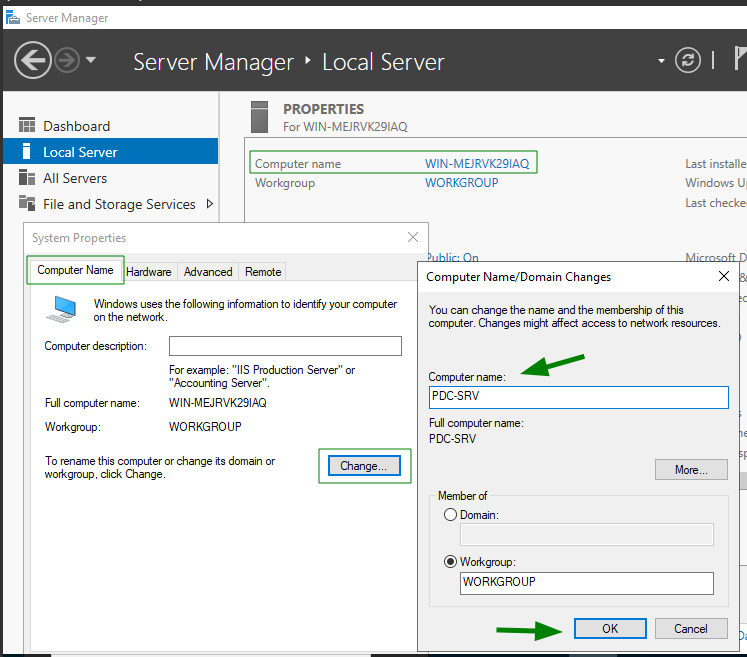
Then
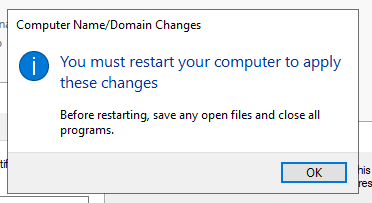
Then "Restart Now"
Preparing the desired IP address for the machine:
From Win + R :
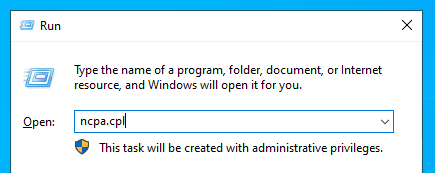
then :
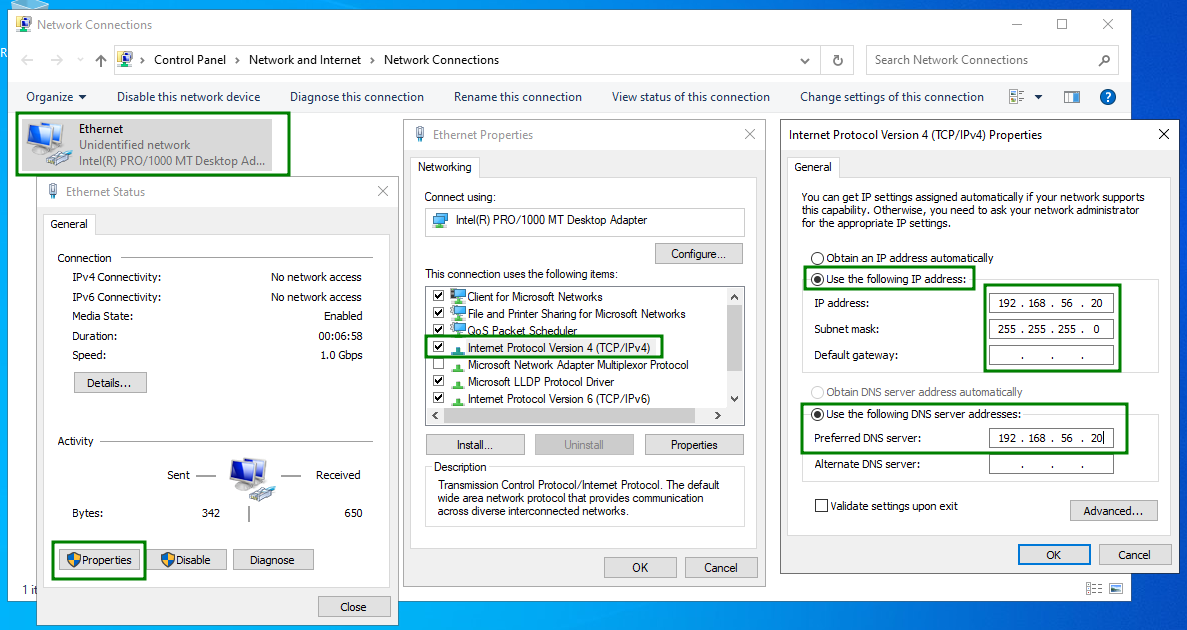
The server must have a static IP address to ensure stability of services (such as Active Directory or DNS).
The IP Address: is set to
192.168.56.20to be the identifier of this machine in your internal network.The Preferred DNS server: is set to the same device address (
192.168.56.20); this usually indicates that you intend to install the Domain Controller role on this server to handle name resolution in your lab.
Check this ip used cmd :
C:\Users\Administrator>ipconfig

Windows IP Configuration


Ethernet adapter Ethernet:

   Connection-specific DNS Suffix  . :
   Link-local IPv6 Address . . . . . : fe80::79a5:124:144d:7510%6
   IPv4 Address. . . . . . . . . . . : 192.168.56.20
   Subnet Mask . . . . . . . . . . . : 255.255.255.0
   Default Gateway . . . . . . . . . :

C:\Users\Administrator>
✅ Change Name Server
✅ Change IP Address
Setting the time:
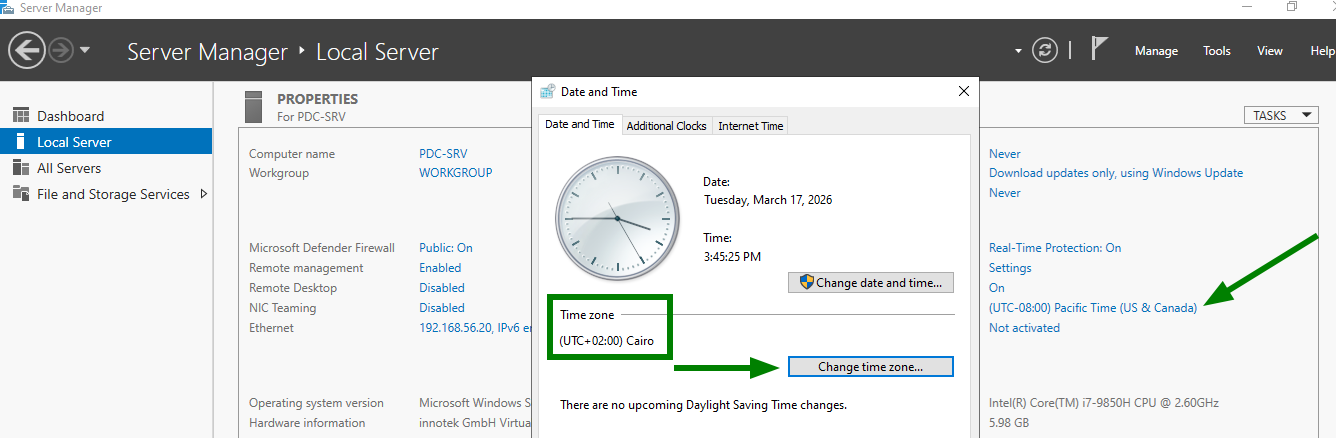
Set the Time Zone to match Cairo time
(UTC+02:00)inside Server Manager.Setting time correctly is mission critical in Active Directory environments; if the server time differs from domain machines by more than 5 minutes, authentication will fail completely due to the Kerberos protocol.
✅ Time configured.
Now creating the domain named "AAAS.local":
Add Role :
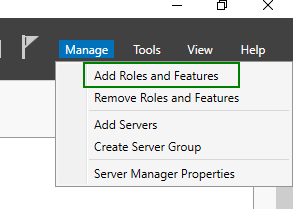
This is the gateway that allows you to transform this normal server into a specialized server in your lab; from here you install Roles.
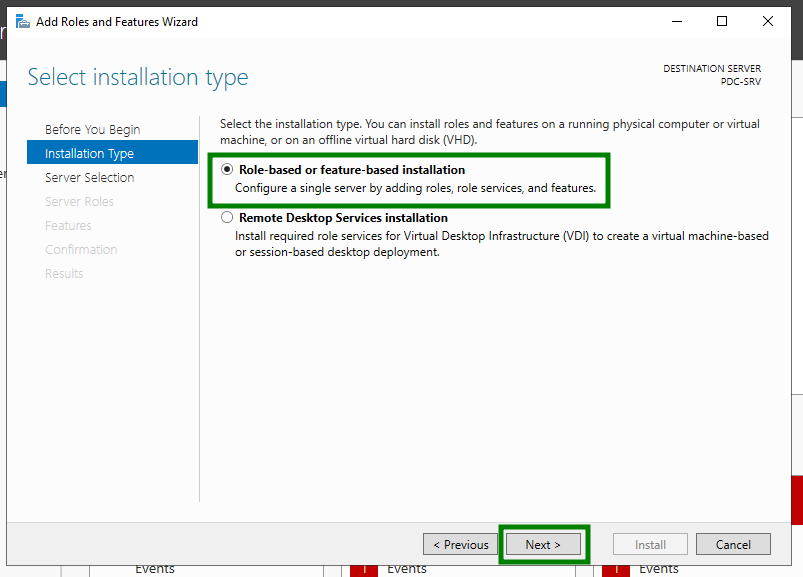
Select installation type "Role-based or feature-based installation", which is the default option for adding roles directly to the current server.
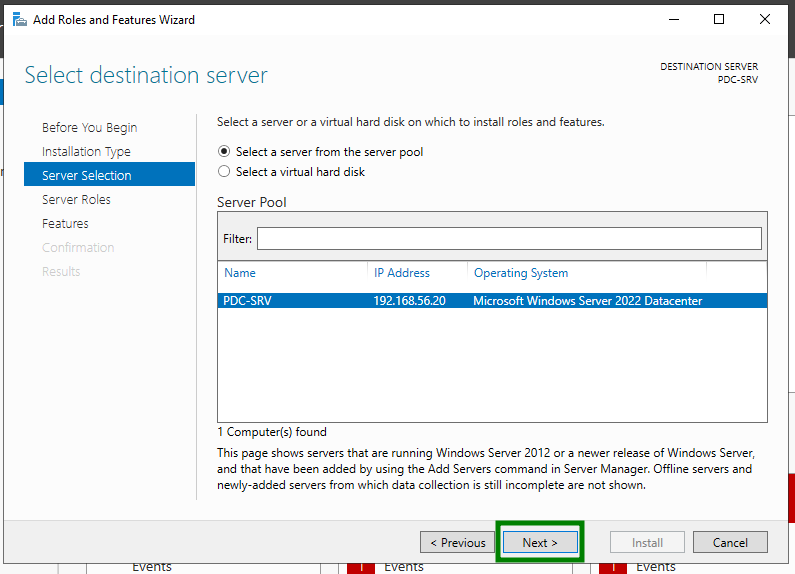
- Select destination server, confirming PDC-SRV with IP
192.168.56.20.
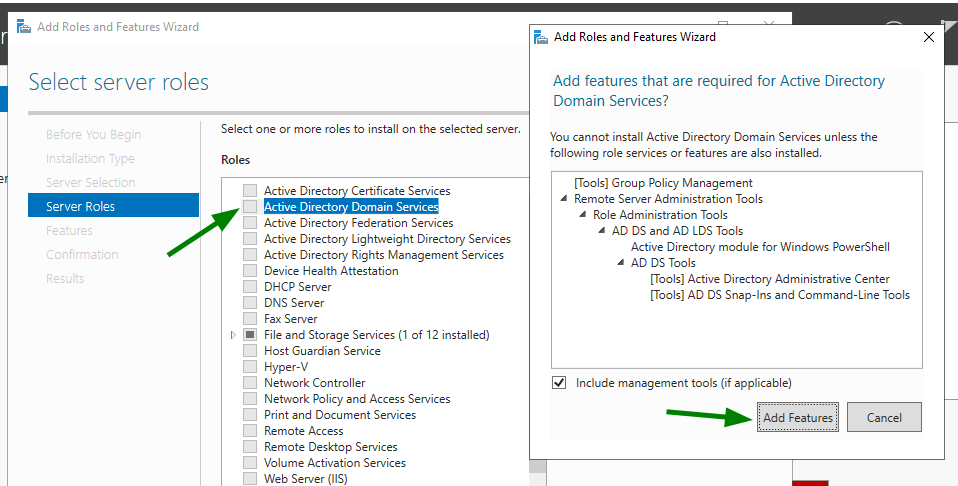
- Select "Active Directory Domain Services" and accept adding required features automatically.
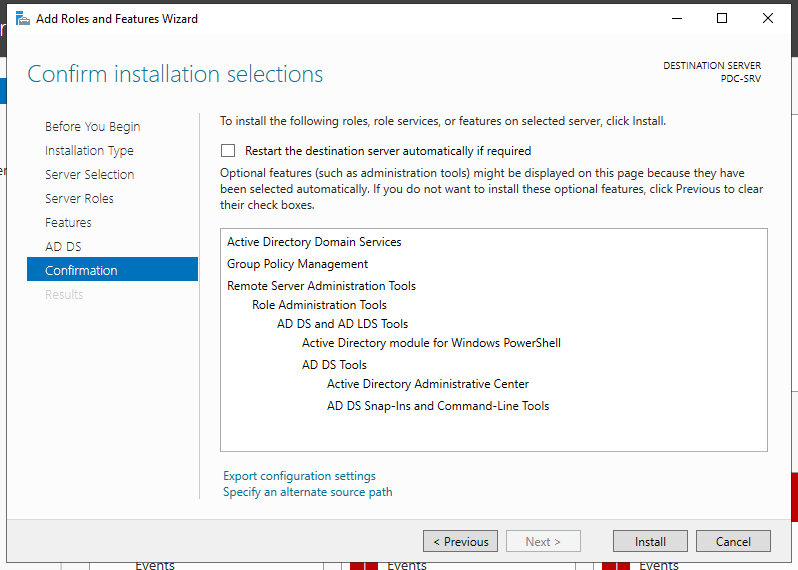
Confirm installation selections:
Active Directory Domain Services: main role.
Group Policy Management: policy management tool.
Remote Server Administration Tools: remote management tools.
Configure Active Directory :
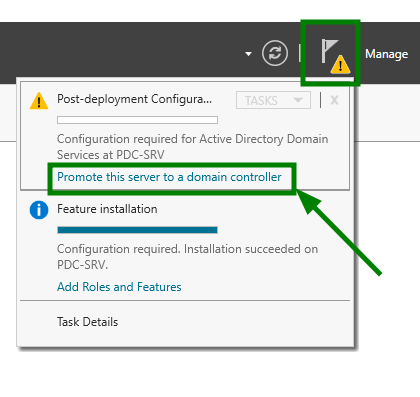
Installing AD files does not make the server a Domain Controller yet; clicking this starts the configuration wizard.
In this step you will create a new forest and define the domain name.
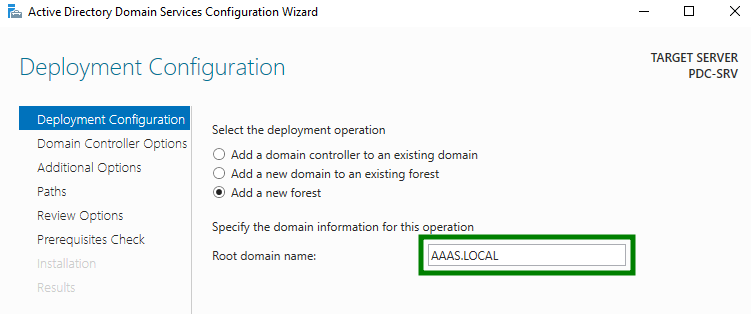
Choose "Add a new forest" and set domain to
AAAS.LOCAL.
.localis commonly used in labs to avoid conflicts with real domains.
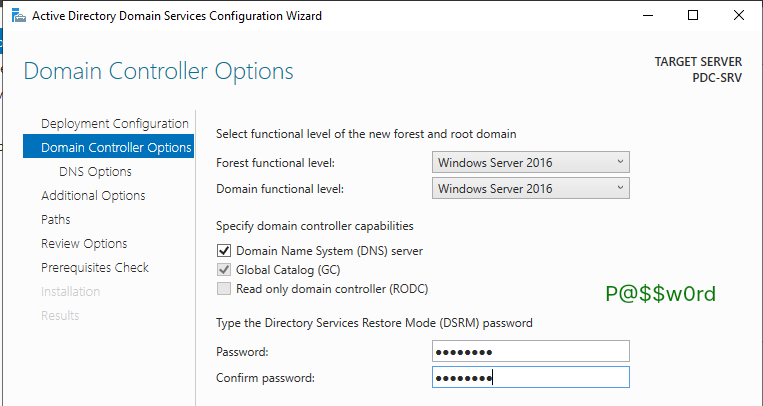
Configure Domain Controller options:
Functional Level: Windows Server 2016.
Capabilities: DNS + Global Catalog enabled.
DSRM Password: emergency recovery password.
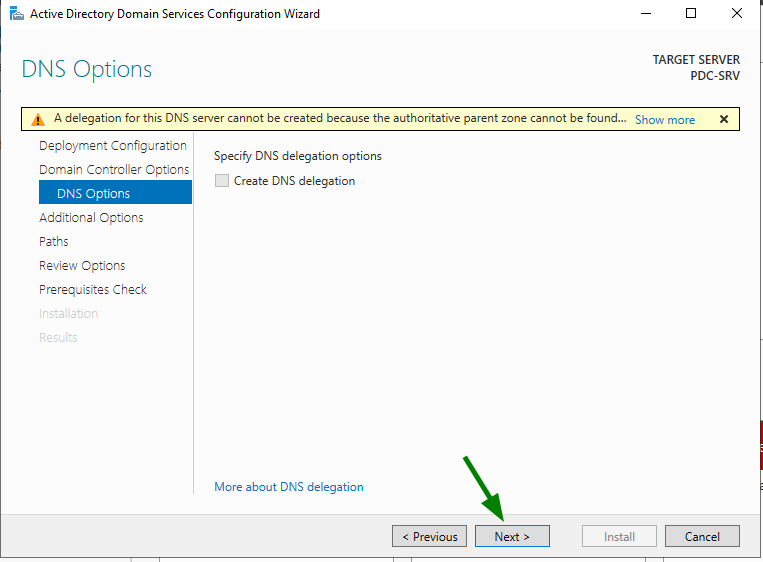
Since this is a new forest, there is no higher DNS server for delegation, don’t worry.
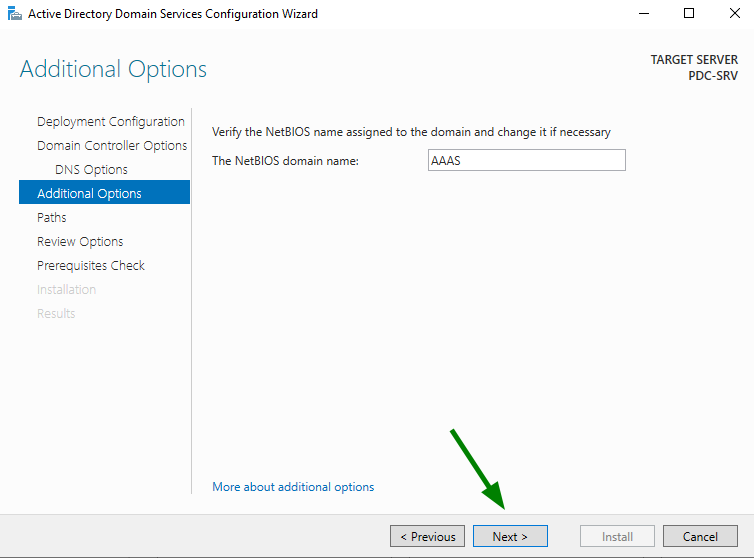
NetBIOS name automatically set to AAAS.
Used for legacy systems and login like
AAAS\Administrator.
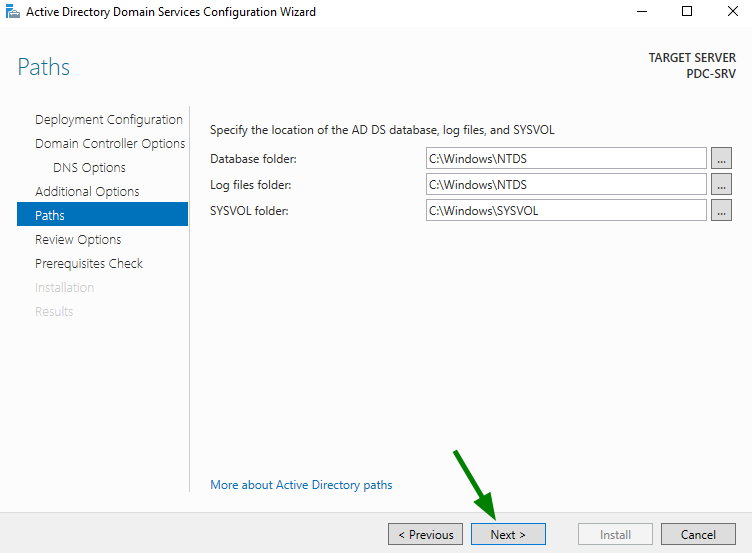
Storage paths:
NTDS: contains domain database.
SYSVOL: stores policies and scripts.
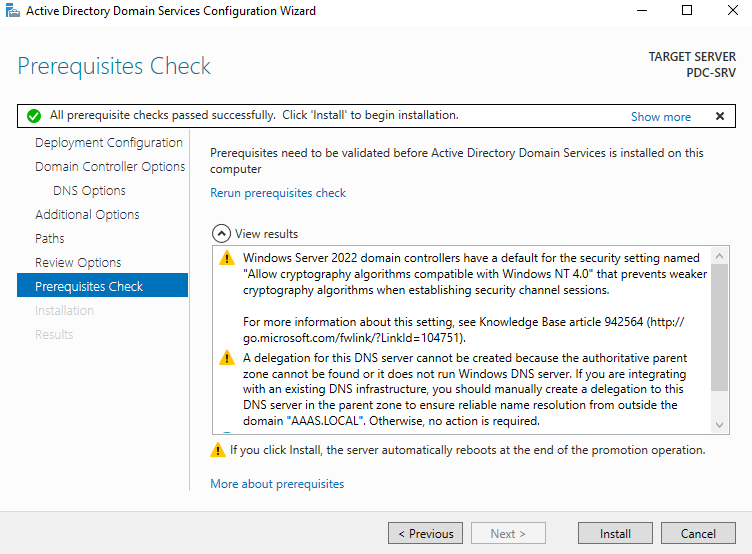
Prerequisites check passed successfully.
Click Install → server restarts automatically.
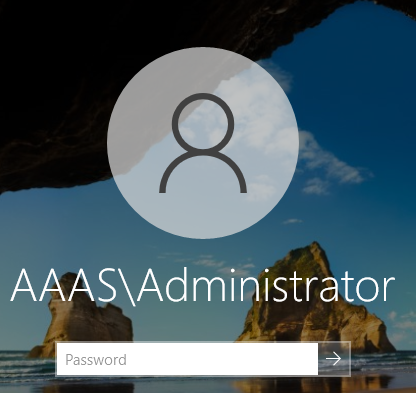
✅ Domain "AAAS.local" created
Client Machine Setup:
Installed Windows on VM + Tools, then:
Set IP:
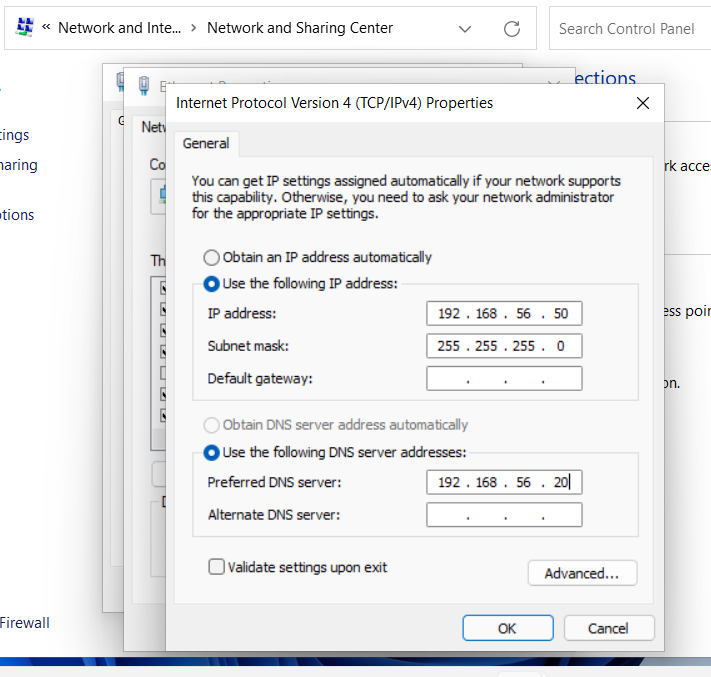
Change device name:
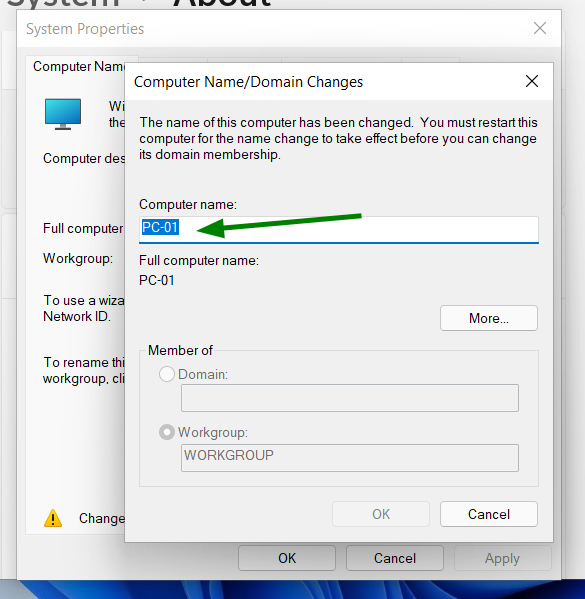
Then restart
Verify connectivity:
ping 192.168.56.20
Join Domain:
Settings → System → About → Rename this PC Advanced:
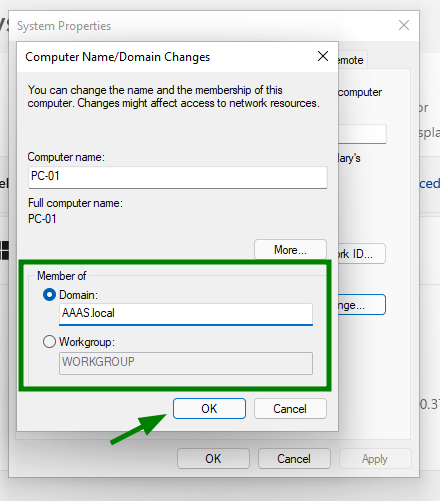
Then:
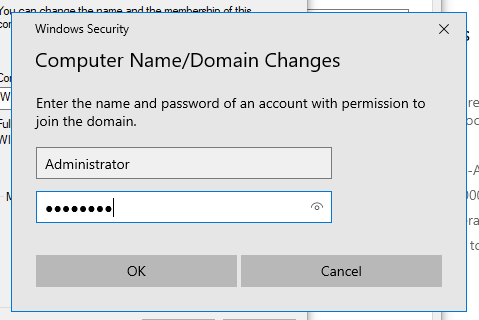
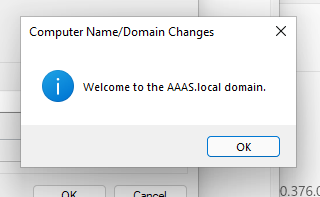
Then Restart VM
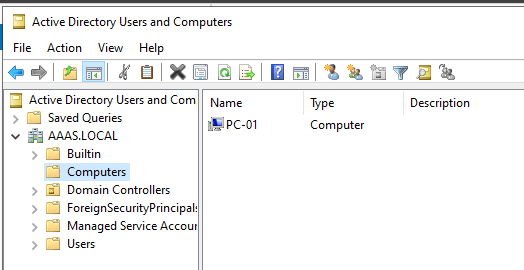
✅ Domain joined successfully ✅ Infrastructure Setup Completed
---
Second: Users & Groups Management (AD Users & Computers):
From AD User And Computer
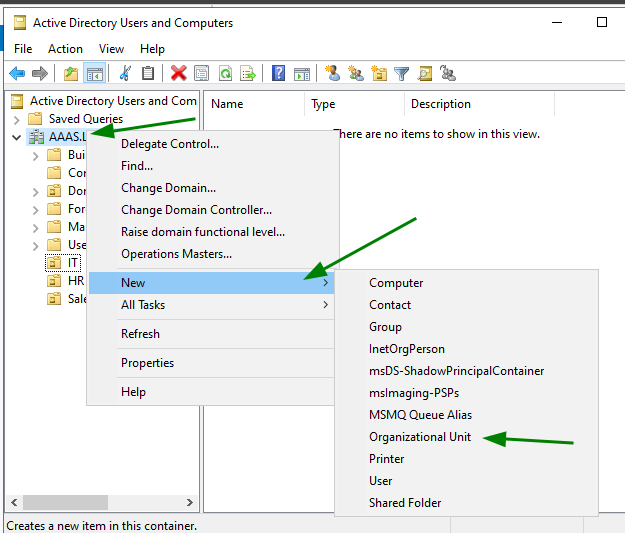
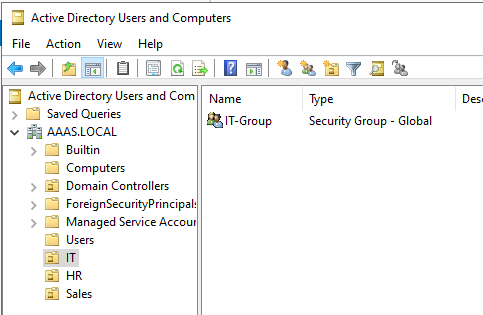
Creating Organizational Units (OUs): Create a separate OU for each of (HR, Sales, IT).
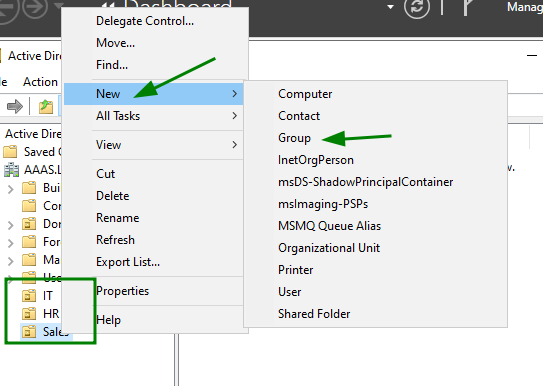
Creating Groups: Create a group for each department (HR-Group, Sales-Group, IT-Group):
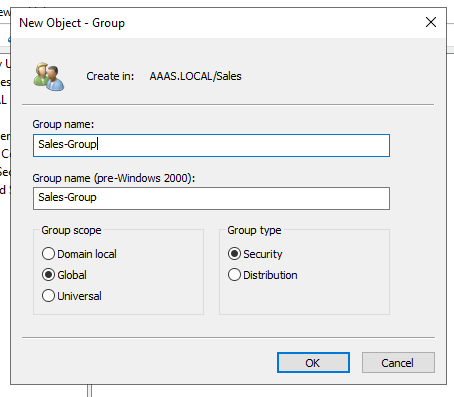
Security is the only type that allows you to assign permissions on files and apply Group Policy Objects (GPOs).
I chose Global:
- In a single domain scenario (
AAAS.LOCAL) that you are building, the Global Group is the standard choice.- Because it is designed to group users who share the same "role" (such as IT or HR employees).
This is their final shape:
Creating Users and Assigning Them:
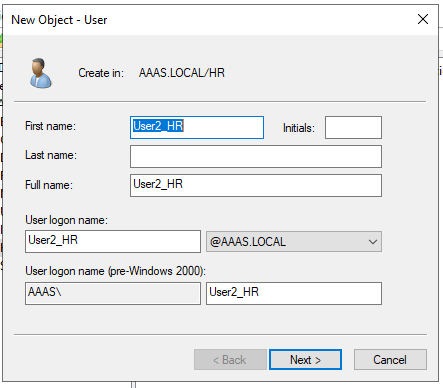
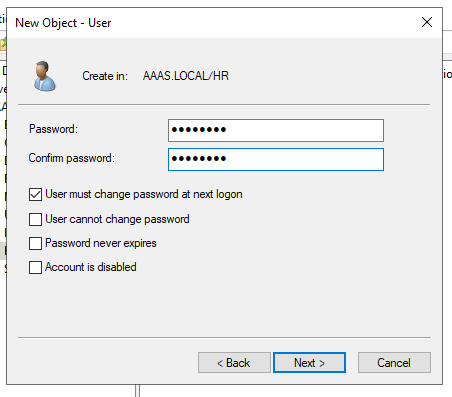
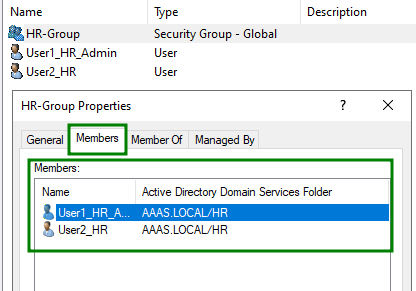
HR Department: Create User1_HR_Admin and User2_HR and add them to the HR group.
- Inside the HR OU: Right-click and choose New -> User, then create
User1_HR_AdminandUser2_HR.
then:
-
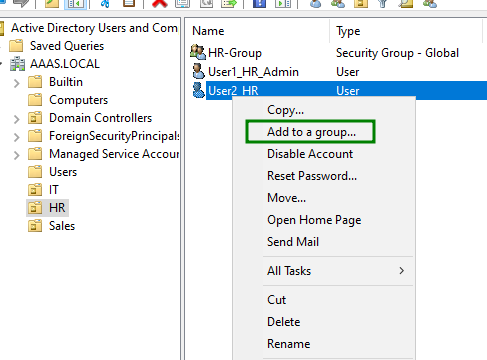
Add them to the HR group:
-
Right-click on the user (for example
User1_HR_Admin).
-
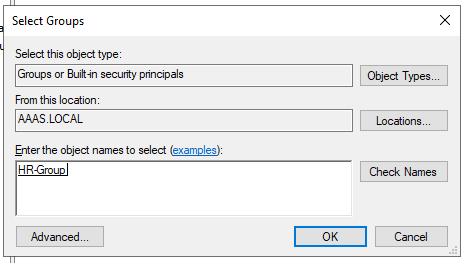
Choose Add to a group:
-
Enter the group name
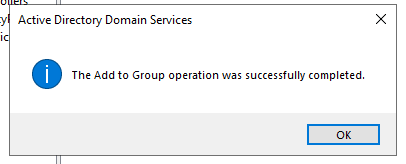
HR-Groupand click OK:
-
To verify:
-
On the group, click Properties:
-
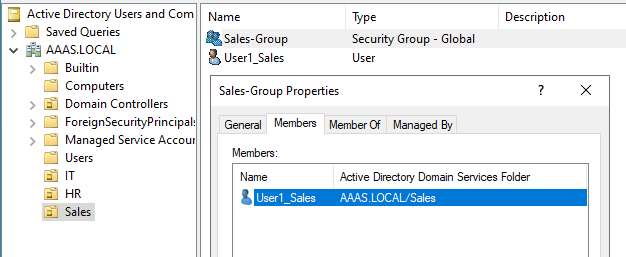
Sales Department: Create User1_Sales and add it to the Sales group:
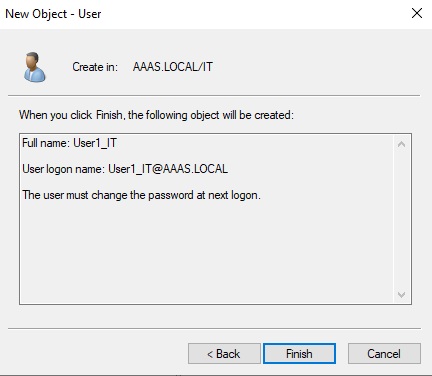
IT Department: Create User1_IT and add it to the IT group:
✅ Users and Groups Management (AD Users & Computers) completed
---
Third: Security & Password Policies (Password & Account Policies)
Password Policy:
I opened Group Policy Management:
Then navigated to Forest: AAAS.LOCAL -> Domains -> AAAS.LOCAL:
Since this policy applies to all users at the domain level, I modified the Default Domain Policy:
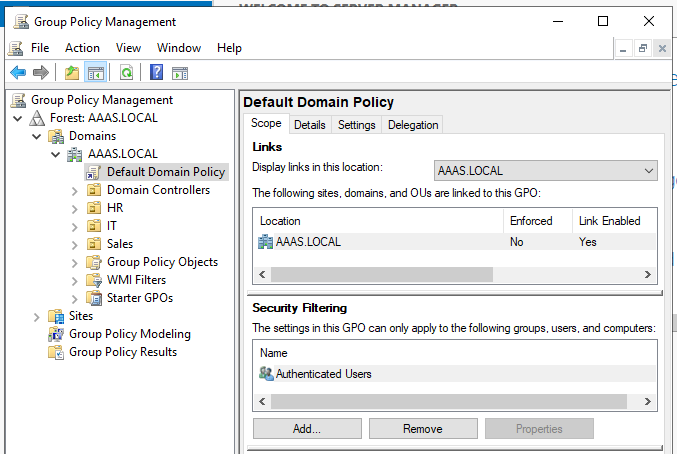
Right-clicked on Default Domain Policy and selected Edit.
To start configuring the password policy:
Computer Configuration > Policies > Windows Settings > Security Settings > Account Policies > Password Policy
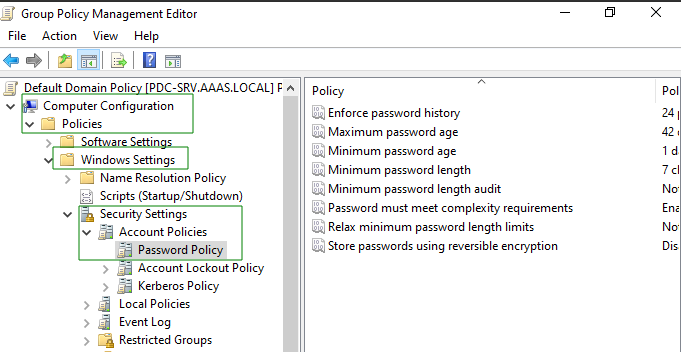
- Change password every 90 days:
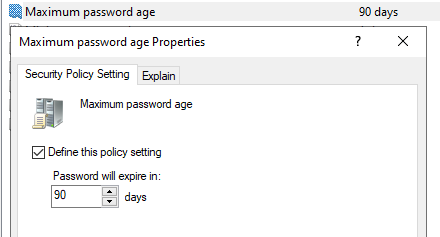
Set it to 90 days.
- Minimum length: 4 characters/numbers:
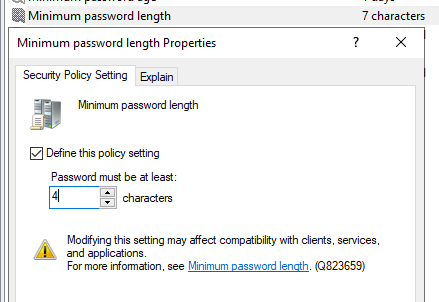
Set it to 4 characters/numbers.
- Disable password complexity:
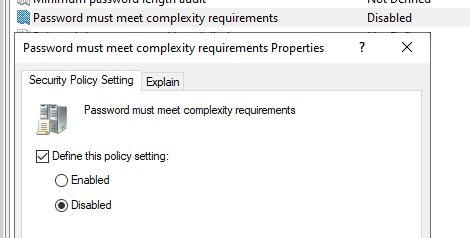
Set it to Disabled (to allow simple passwords like 1234).
- Remember last 2 passwords (Password History):
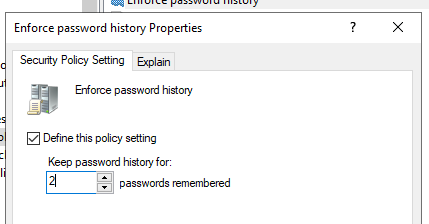
Set it to 2 (to remember the last two passwords).
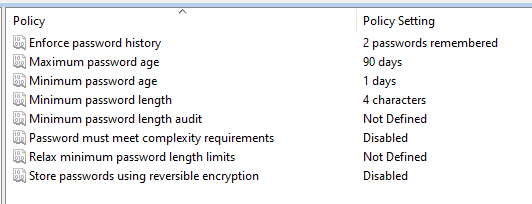
✅ Password policy configured: remember last 2 passwords, change every 90 days, minimum length 4 characters, and complexity disabled.
Account Lockout Policy:
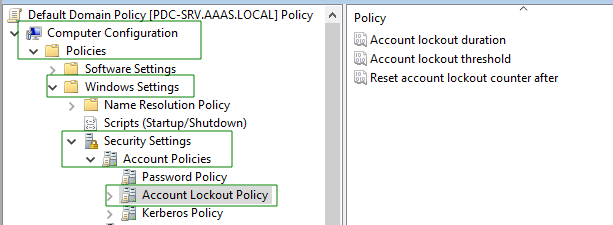
In the same location, I selected Account Lockout Policy:
-
Lockout for 60 minutes after 5 failed attempts.
-
Account lockout threshold:
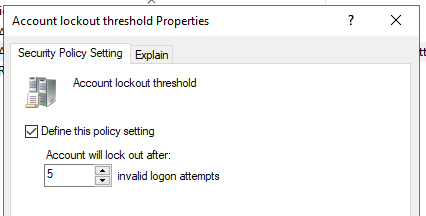
Set it to 5 failed attempts.
- Account lockout duration:
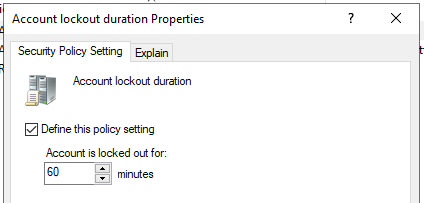
Set it to 60 minutes.
- Reset account lockout counter after:
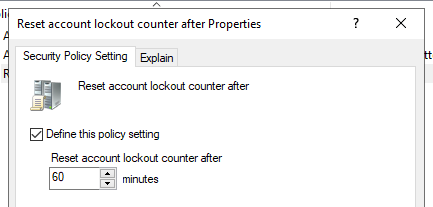
Also set to 60 minutes (or based on your preference to keep timing consistent).
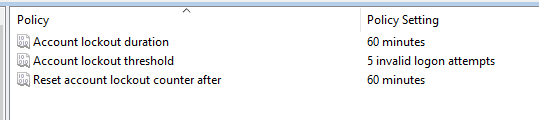
✅ Applied rule: "5 failed attempts = 1 hour lockout".
Since these settings are under (User Configuration), running gpupdate /force on the server will not immediately apply changes to the user (PC-01).
- Solution: After finishing everything and running
gpupdateon the server, go to the client machine (PC-01), log in withUser2_HRfor example, and rungpupdate /forcethere as well, or perform Sign out and Sign in so the new policies are applied immediately to the user.
---
Fourth: Group Policy Objects (GPO)
1. Restrictions & Control:
Since we will apply policies to specific types of users, we will work under:
User Configuration > Policies > Administrative Templates
Since these restrictions (CMD, Run, Control Panel) are required for both HR and Sales, we will create one GPO:
Restricted_Users_Policy :
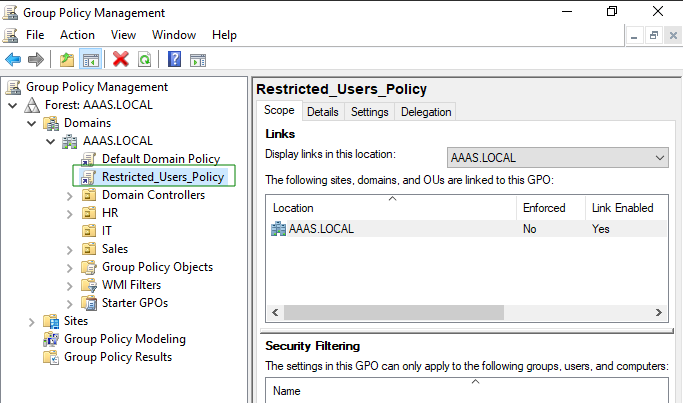
Then go to the HR OU and Sales OU, right-click and choose Link an Existing GPO, then select it.
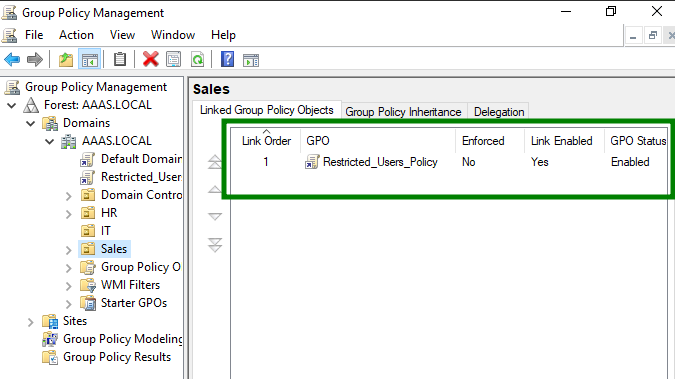
Hide Programs and Features (for HR & Sales)
Inside Restricted_Users_Policy, right-click → edit:
User Configuration > Policies > Administrative Templates > Control Panel > Programs :
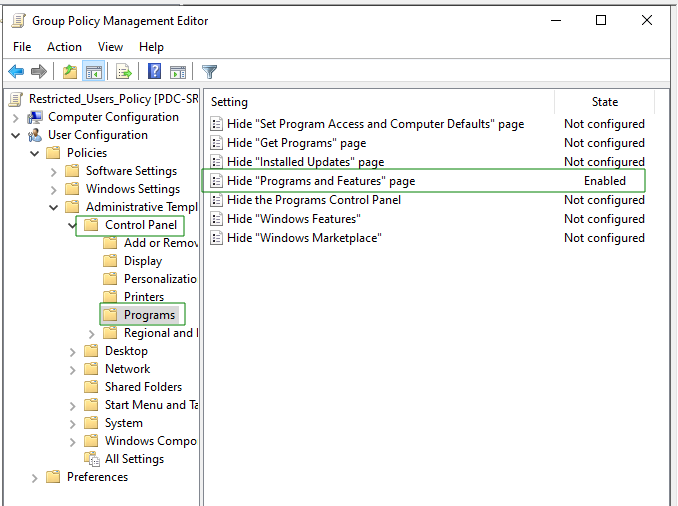
✅ When the user opens the Control Panel, they won’t find a place to uninstall programs.
Remove Properties from This PC
Inside Restricted_Users_Policy, right-click → edit:
User Configuration > Policies > Administrative Templates > Desktop :
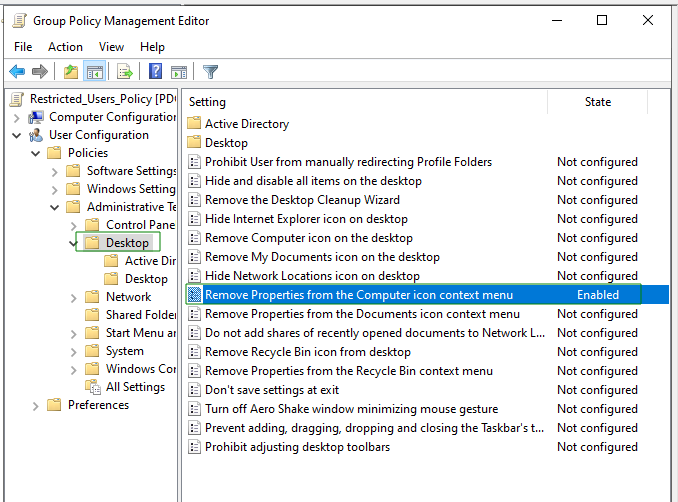
✅ If the user right-clicks on "This PC", the Properties option will be removed, so they won’t be able to see system specs or the domain name.
Disable CMD and Run (for HR & Sales)
Inside Restricted_Users_Policy, right-click → edit:
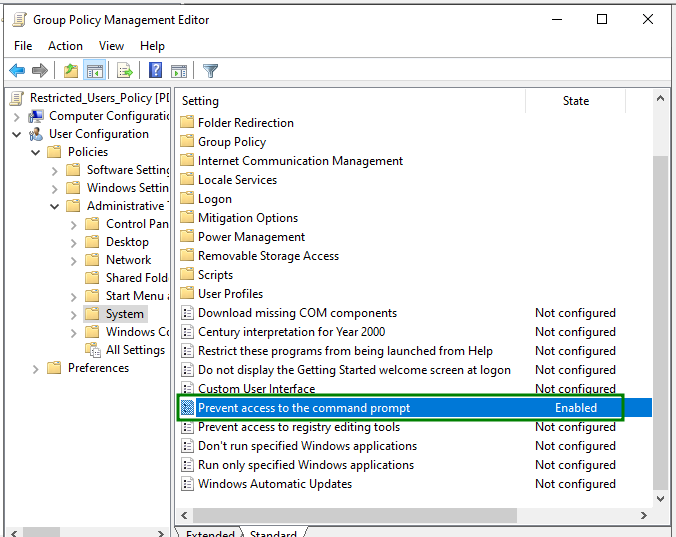
User Configuration > Policies > Administrative Templates > System :
- First setting:
Prevent access to the command prompt→ set it to Enabled:
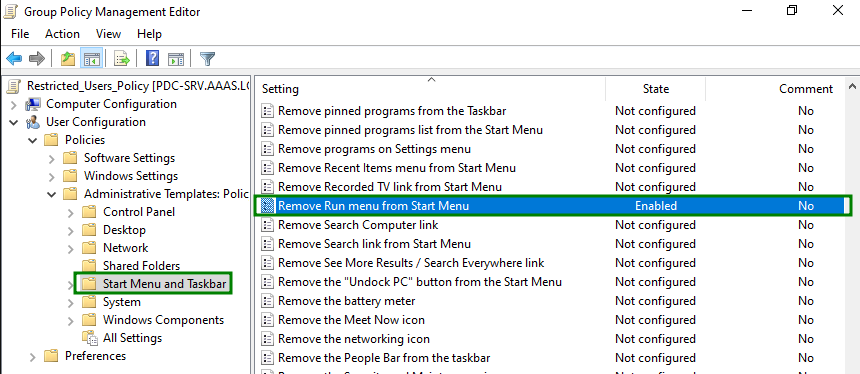
- Second setting:
Remove Run menu from Start Menu→ set it to Enabled.
User Configuration > Policies > Administrative Templates > Start Menu and Taskbar :
Remove Task Manager (for everyone except IT):
This requires a special "technique" because it includes an exception:
Create a new GPO named: Global_Restrict_TaskManager_GPO.
Right-click → Edit:
User Configuration > Policies > Administrative Templates > System > Ctrl+Alt+Del Options :
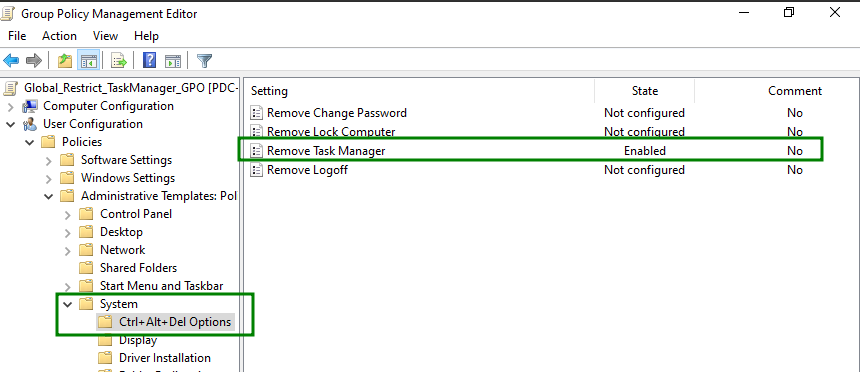
Setting:
Remove Task Manager→ set it to Enabled.
Creating an exception for the IT team (most important step):
Since the policy is linked to the entire domain, the IT team will also be affected unless you do the following:
-
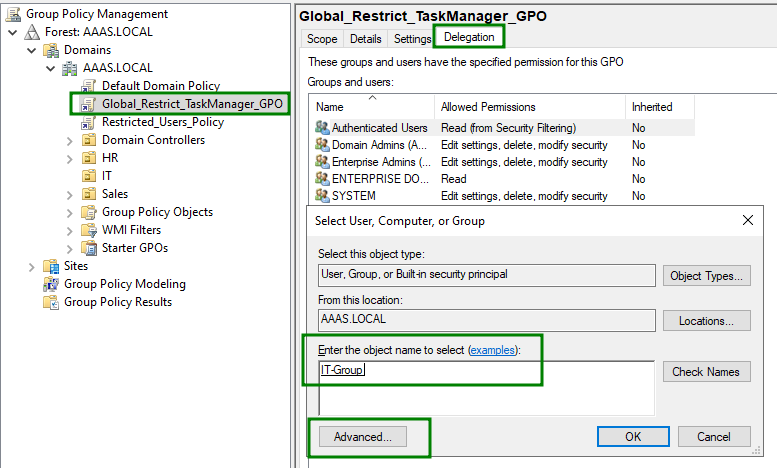
From the Group Policy Management console, select the policy you created.
-
On the right side, go to the Delegation tab.
-
Click Add and add the group
IT-Group.
-
Click the Advanced button at the bottom.
-
Select
IT-Groupfrom the list, and in the permissions below, find Apply group policy. -
Check Deny.
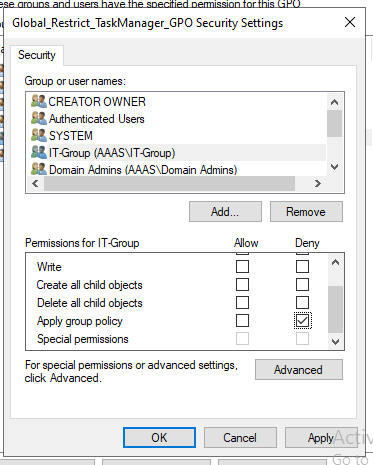
✅ Windows will read the policy for all users, but when it reaches a user in the IT group, it will see the "Deny" permission and skip the policy, allowing Task Manager to work normally.
2. Storage & Network Management:
External Storage: Disable USB and flash drives for HR users, with an exception for the HR Manager (User1_HR_Admin).
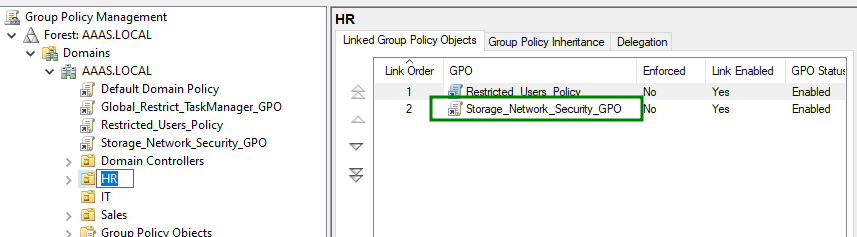
Create a new GPO named Storage_Network_Security_GPO to disable USB for HR (with manager exception):
Link Storage_Network_Security_GPO to the HR OU only:
From the path:
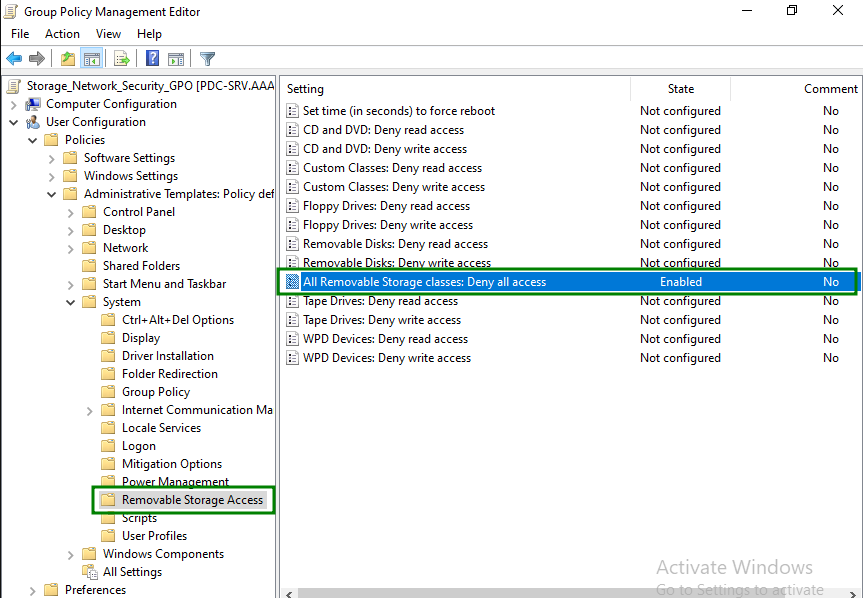
User Configuration > Policies > Administrative Templates > System > Removable Storage Access
Enable: All Removable Storage classes: Deny all access
Then create an exception for the manager:
From the Delegation tab in the policy, add User1_HR_Admin:
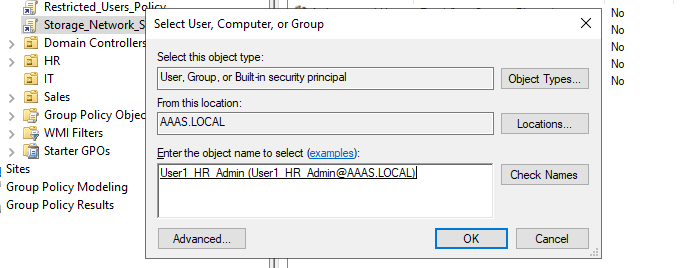
Set Deny on Apply group policy (same method used for IT):
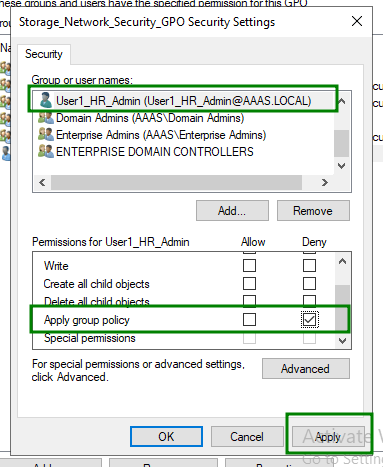
✅ Now HR users cannot use USB devices, except the HR Admin (manager).
Windows Firewall: Allow Ping traffic for all devices via GPO:
Create a new GPO named Network_Security_Firewall_GPO
Link it to the Root Domain (AAAS.LOCAL) to include the server and PC-01
Right-click → Edit. Since this is a computer-level setting, go to Computer Configuration:
Path:
Computer Configuration > Policies > Windows Settings > Security Settings > Windows Defender Firewall with Advanced Security
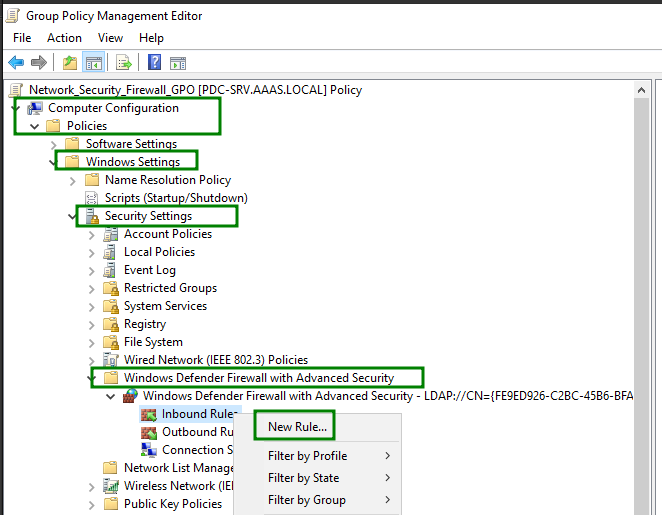
Under Inbound Rules, create a new rule (New Rule) of type Predefined
Select File and Printer Sharing:
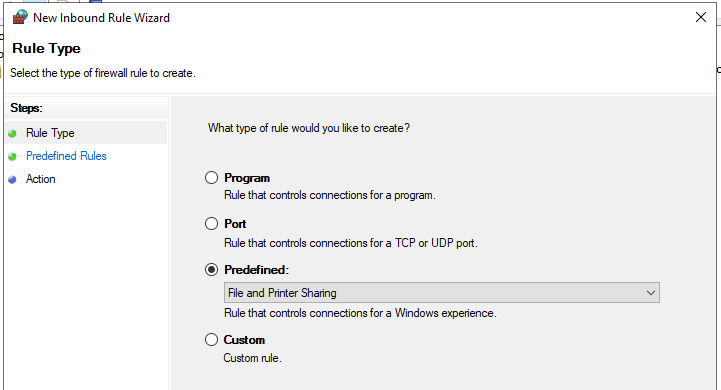
Then click Next.
On the next page, find:
File and Printer Sharing (Echo Request - ICMPv4-In)
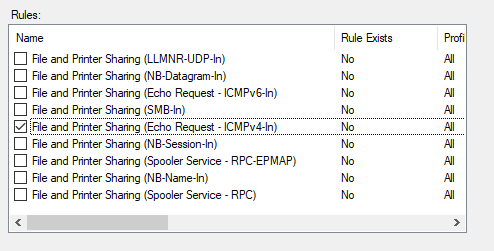
- Click Next
On the Action page, make sure Allow the connection is selected.
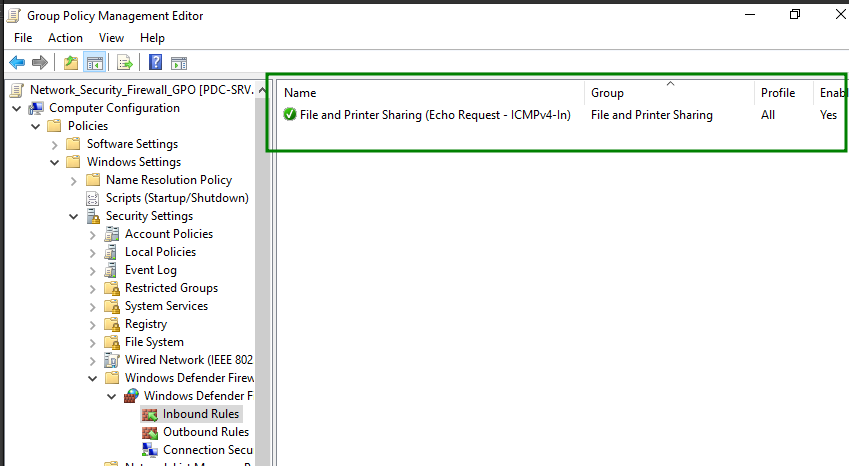
✅ Now Ping traffic is allowed through Windows Firewall via GPO.
3. Deployment & Local Users:
Since this requirement includes both user settings (Shortcut) and computer settings (Local Admin), we will create a new GPO named:
Deployment_LocalAdmin_GPO.
Desktop URL: Create a desktop shortcut for HR users pointing to: http://hrapp.test.local
Go to Deployment_LocalAdmin_GPO
Path:
User Configuration > Preferences > Windows Settings > Shortcuts
- Right-click → New → Shortcut:
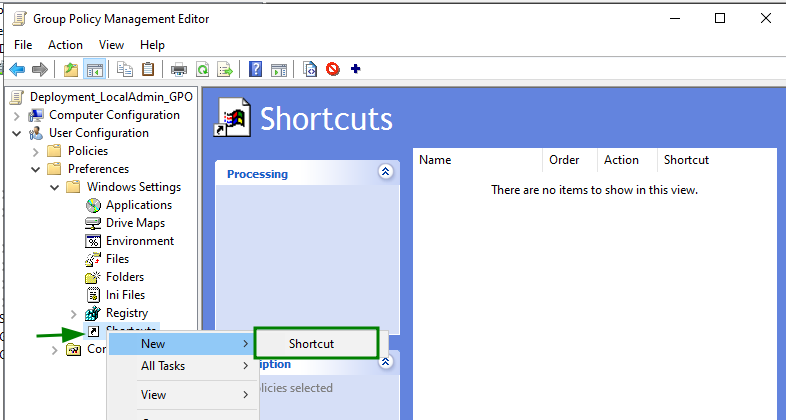
-
Action: Keep it
Update -
Name:
HR App -
Target Type:
URL -
Location:
Desktop -
Target URL:
http://hrapp.test.local
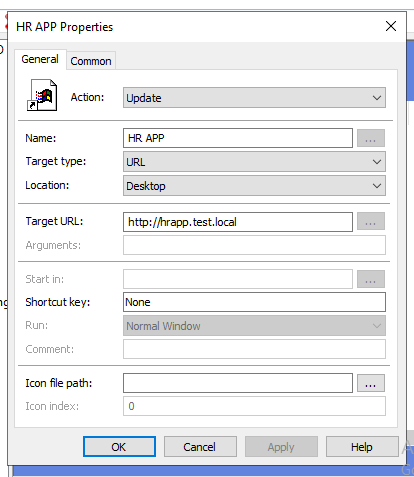
Then link this policy to the HR OU only so it doesn’t appear for other users:
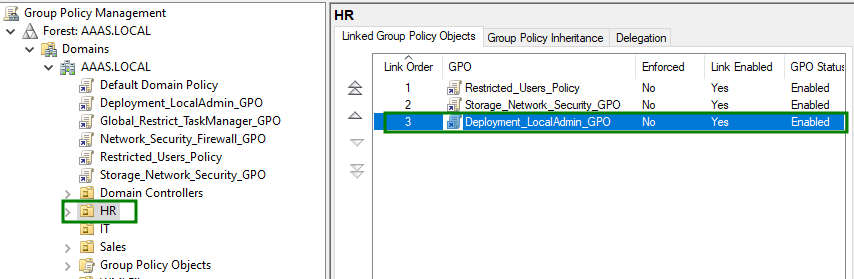
✅ Desktop shortcut created for HR users pointing to
http://hrapp.test.local.
Local Admin (Group): Add IT-Group as local administrators on domain machines
So the IT team can manage any machine without needing the Domain Admin password.
In Deployment_LocalAdmin_GPO, right-click → Edit:
Path:
Computer Configuration > Policies > Windows Settings > Security Settings > Restricted Groups
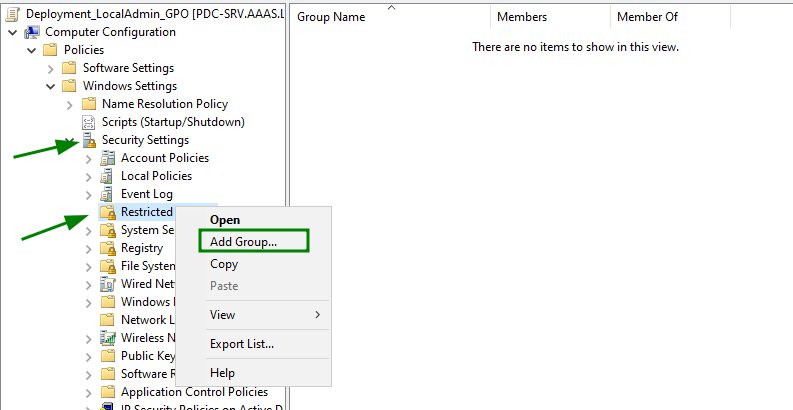
Add the group: Right-click → Add Group
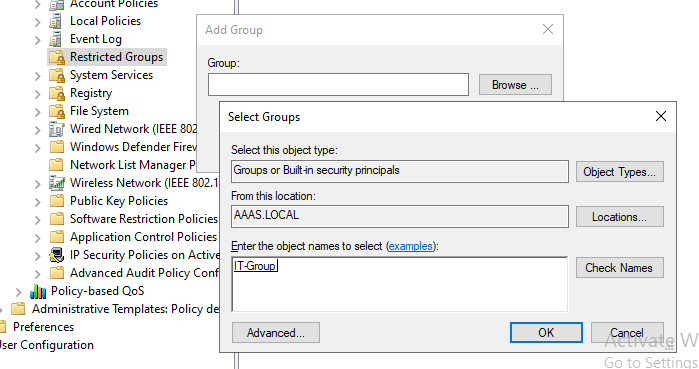
Click Browse, search for IT-Group, then OK:
To assign permissions:
In This group is a member of, click Add and add Administrators
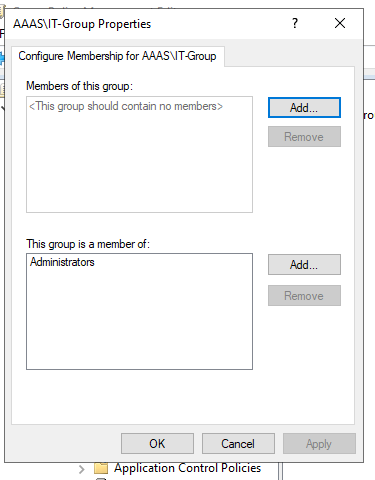
Refers to the local Administrators group on any Windows machine
Why we used This group is a member of instead of Members of this group:
Because using Members of this group would remove any existing local admins and replace them with IT only (risky if you lock yourself out).
This group is a member of is safer—it keeps existing admins and adds IT on top with full privileges.
✅ IT-Group successfully added as local administrators on domain machines
Local Admin (User): Create a local user itadmin on all domain machines using GPO
In the same GPO Deployment_LocalAdmin_GPO:
Open Editor and go to:
Computer Configuration > Preferences > Control Panel Settings > Local Users and Groups
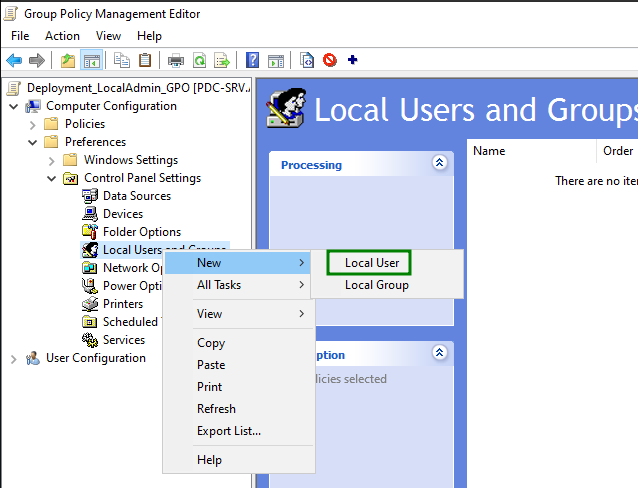
However, this method will not work because:
Microsoft released a security patch that prevents storing passwords inside GPO Preferences.
-
Open the GPO (
Deployment_LocalAdmin_GPO) → Edit -
Go to:
Computer Configuration>Policies>Windows Settings>Scripts (Startup/Shutdown) -
Double-click Startup
-
Click Show Files → a folder will open
-
Right-click → New → Text Document
-
Name it
itadmin.bat(make sure it’s.bat, not.txt)
Open it in Notepad and write exactly:
net user itadmin 1234 /add && net localgroup administrators itadmin /add
-
Save and close Notepad
-
In the Startup window, click Add → Browse → select the file
-
Click OK → OK
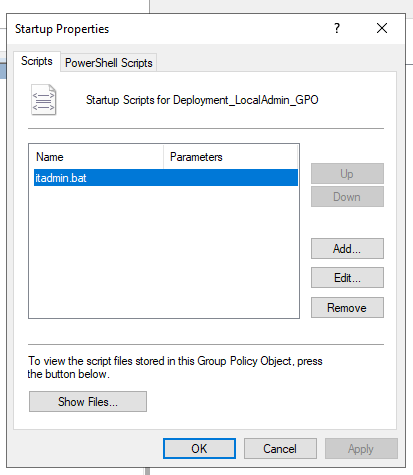
Now everything is set, my friend
Final OU linking structure:
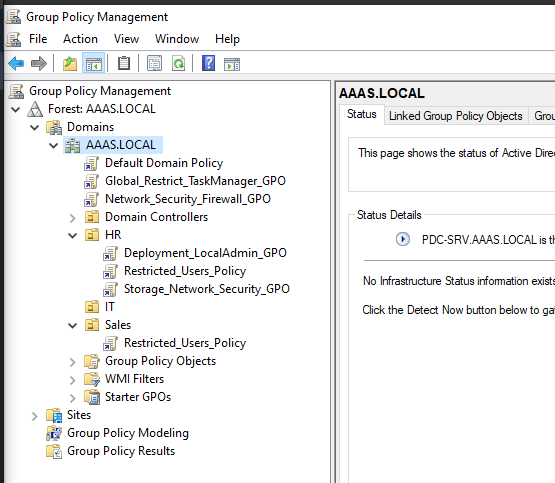
Run:
gpupdate /force
On both Client and Server, then start verification.
Final Summary:
| Section | CMD/Run | Task Manager | USB Access | Local Admin? |
|---|---|---|---|---|
| Administrator | Available | Available | Available | Of course |
| IT Group | Available | Available (Exception) | Available | Yes |
| HR Users | Restricted | Restricted | Restricted | No |
| Sales Users | Restricted | Restricted | Available | No |
| HR Admin | Restricted | Restricted | Available (Exception) | No |
✅ 1.AD Hardening & Compliance Simulation (Windows Server) Is DONE