1.Infrastructure Setup :
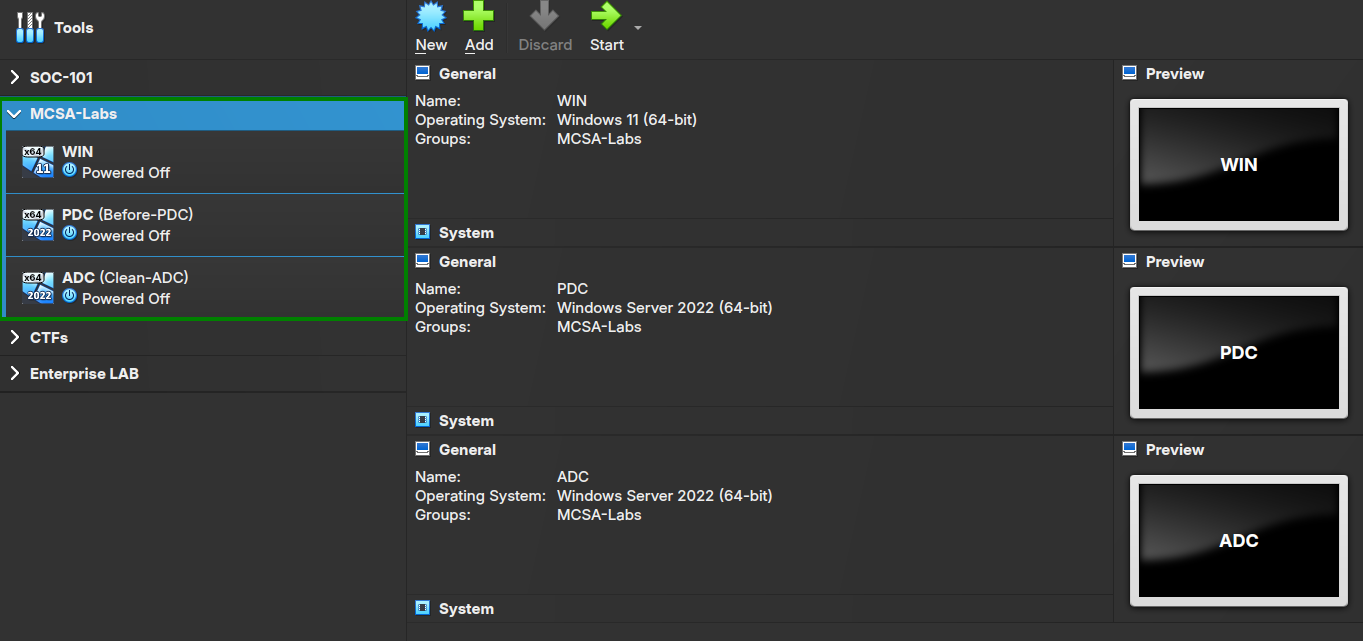
Step 1: Preparing the Servers (PDC & ADC)
I mentioned installing Windows Server before, so let’s start by installing Active Directory, configuring the IP addresses, and changing the server names so the connection works correctly.
| Device | IP Address | Subnet Mask | Default Gateway | Preferred DNS |
|---|---|---|---|---|
| PDC | 192.168.56.2 |
255.255.255.0 |
192.168.56.1 |
127.0.0.1 |
| ADC | 192.168.56.3 |
255.255.255.0 |
192.168.56.1 |
192.168.56.2 |
1. Configuring the Primary Server (PDC)
- Change the name: From Computer Properties, change the name to PDC and perform a restart.
- Configure the IP from Network and Sharing Center:
- IP Address:
192.168.56.10 - Subnet Mask:
255.255.255.0 - Default Gateway:
192.168.56.1 - Preferred DNS:
127.0.0.1OR192.168.56.10(because it will act as the DNS later).
- IP Address:
C:\Users\Administrator>ipconfig /all

Windows IP Configuration

   Host Name . . . . . . . . . . . . : PDC
   Primary Dns Suffix  . . . . . . . :
   Node Type . . . . . . . . . . . . : Hybrid
   IP Routing Enabled. . . . . . . . : No
   WINS Proxy Enabled. . . . . . . . : No

Ethernet adapter Ethernet:

   Connection-specific DNS Suffix  . :
   Description . . . . . . . . . . . : Intel(R) PRO/1000 MT Desktop Adapter
   Physical Address. . . . . . . . . : 08-00-27-68-FE-D5
   DHCP Enabled. . . . . . . . . . . : No
   Autoconfiguration Enabled . . . . : Yes
   Link-local IPv6 Address . . . . . : fe80::1c7f:2aa7:ecf9:2715%6(Preferred)
   IPv4 Address. . . . . . . . . . . : 192.168.56.10(Preferred)
   Subnet Mask . . . . . . . . . . . : 255.255.255.0
   Default Gateway . . . . . . . . . : 192.168.56.1
   DHCPv6 IAID . . . . . . . . . . . : 101187623
   DHCPv6 Client DUID. . . . . . . . : 00-01-00-01-31-51-80-91-08-00-27-68-FE-D5
   DNS Servers . . . . . . . . . . . : 127.0.0.1
   NetBIOS over Tcpip. . . . . . . . : Enabled

C:\Users\Administrator>
2. Configuring the Additional Server (ADC)
- Change the name: Change the name to ADC.
- Configure the IP:
- IP Address:
192.168.56.11 - Subnet Mask:
255.255.255.0 - Default Gateway:
192.168.56.1 - Preferred DNS:
192.168.56.10(it must point to the PDC first so it can join the domain).
- IP Address:
C:\Users\Administrator>ipconfig /all

Windows IP Configuration

   Host Name . . . . . . . . . . . . : ADC
   Primary Dns Suffix  . . . . . . . :
   Node Type . . . . . . . . . . . . : Hybrid
   IP Routing Enabled. . . . . . . . : No
   WINS Proxy Enabled. . . . . . . . : No

Ethernet adapter Ethernet:

   Connection-specific DNS Suffix  . :
   Description . . . . . . . . . . . : Intel(R) PRO/1000 MT Desktop Adapter
   Physical Address. . . . . . . . . : 08-00-27-B6-6B-8C
   DHCP Enabled. . . . . . . . . . . : No
   Autoconfiguration Enabled . . . . : Yes
   Link-local IPv6 Address . . . . . : fe80::4c2d:31d5:8891:dc4f%4(Preferred)
   IPv4 Address. . . . . . . . . . . : 192.168.56.11(Preferred)
   Subnet Mask . . . . . . . . . . . : 255.255.255.0
   Default Gateway . . . . . . . . . : 192.168.56.1
   DHCPv6 IAID . . . . . . . . . . . : 101187623
   DHCPv6 Client DUID. . . . . . . . : 00-01-00-01-31-51-85-F6-08-00-27-B6-6B-8C
   DNS Servers . . . . . . . . . . . : 192.168.56.10
   NetBIOS over Tcpip. . . . . . . . : Enabled

C:\Users\Administrator>
We make sure the devices can see each other:
- From the ADC :
C:\Users\Administrator>ping 192.168.56.10

Pinging 192.168.56.10 with 32 bytes of data:
Reply from 192.168.56.10: bytes=32 time<1ms TTL=128
Reply from 192.168.56.10: bytes=32 time=1ms TTL=128
Reply from 192.168.56.10: bytes=32 time<1ms TTL=128
Reply from 192.168.56.10: bytes=32 time=1ms TTL=128

Ping statistics for 192.168.56.10:
    Packets: Sent = 4, Received = 4, Lost = 0 (0% loss),
Approximate round trip times in milli-seconds:
    Minimum = 0ms, Maximum = 1ms, Average = 0ms

C:\Users\Administrator>
Step 2: Installing Active Directory on the PDC (or more accurately, it will be the Forest)
This is the moment where we convert the server from a "Workgroup" to a "Domain Controller".
I did the following (the steps were explained in detail in previous labs):
On the PDC machine:
- Opened Server Manager.
- Clicked Manage then Add Roles and Features.
- Selected Active Directory Domain Services and continued until the installation completed.
- After installation, a yellow warning sign will appear at the top in Server Manager, click it and choose:
- Promote this server to a domain controller.
- Select Add a new forest.
- Root domain name: enter
FINAL.LOCAL.
- In the Domain Controller Options page:
- Entered the DSRM password (very important, save it).
- Make sure this server has the roles GC (Global Catalog) and DNS.
-
Completed the wizard (left the NetBIOS name as
FINAL) until it finished and performed an automatic Restart. -
To verify the PDC, I opened PowerShell :
PS C:\Users\Administrator> Get-ADDomainController


ComputerObjectDN           : CN=PDC,OU=Domain Controllers,DC=FINAL,DC=LOCAL
DefaultPartition           : DC=FINAL,DC=LOCAL
Domain                     : FINAL.LOCAL
Enabled                    : True
Forest                     : FINAL.LOCAL
HostName                   : PDC.FINAL.LOCAL
InvocationId               : 574fd1e7-9b71-4a5b-a2ee-cf223f0a267e
IPv4Address                : 192.168.56.10
IPv6Address                :
IsGlobalCatalog            : True
IsReadOnly                 : False
LdapPort                   : 389
Name                       : PDC
NTDSSettingsObjectDN       : CN=NTDS Settings,CN=PDC,CN=Servers,CN=Default-First-Site-Name,CN=Sites,CN=Configuration,DC
                             =FINAL,DC=LOCAL
OperatingSystem            : Windows Server 2022 Datacenter
OperatingSystemHotfix      :
OperatingSystemServicePack :
OperatingSystemVersion     : 10.0 (20348)
OperationMasterRoles       : {SchemaMaster, DomainNamingMaster, PDCEmulator, RIDMaster...}
Partitions                 : {DC=ForestDnsZones,DC=FINAL,DC=LOCAL, DC=DomainDnsZones,DC=FINAL,DC=LOCAL,
                             CN=Schema,CN=Configuration,DC=FINAL,DC=LOCAL, CN=Configuration,DC=FINAL,DC=LOCAL...}
ServerObjectDN             : CN=PDC,CN=Servers,CN=Default-First-Site-Name,CN=Sites,CN=Configuration,DC=FINAL,DC=LOCAL
ServerObjectGuid           : f6467926-bb4e-4973-8d03-7295b239a350
Site                       : Default-First-Site-Name
SslPort                    : 636
Step 3: Adding the ADC to the Domain
Now we will make the second server (ADC) a partner to the PDC.
- On the ADC server, I opened Add Roles and Features and installed ADDS.
- Click on Promote this server to a domain controller.
Then we start from here:
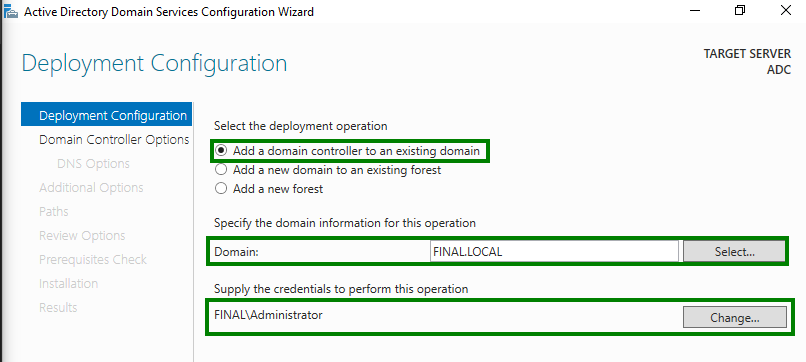
-
This time choose the first option: Add a domain controller to an existing domain.
-
Enter the domain name
FINAL.LOCALand provide the Administrator credentials:
-
Make sure this server has the role as GC (Global Catalog) and DNS.
-
Then it asks me where to retrieve my data from:
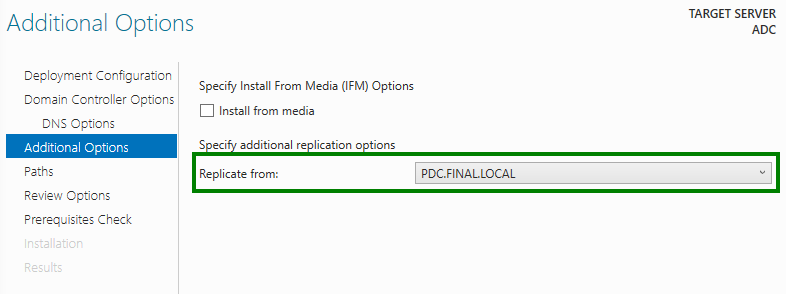
Selected PDC.FINAL.LOCAL from the list.
-
Then click Next again and complete the installation so that it becomes an Additional Domain Controller for our main PDC, after which it will restart automatically.
-
Verification:
PS C:\Users\Administrator.FINAL> Get-ADDomainController

ComputerObjectDN           : CN=ADC,OU=Domain Controllers,DC=FINAL,DC=LOCAL
DefaultPartition           : DC=FINAL,DC=LOCAL
Domain                     : FINAL.LOCAL
Enabled                    : True
Forest                     : FINAL.LOCAL
HostName                   : ADC.FINAL.LOCAL
InvocationId               : bd9460a8-39ea-496e-8a1d-9f4af9c6d82b
IPv4Address                : 192.168.56.11
IPv6Address                :
IsGlobalCatalog            : True
IsReadOnly                 : False
LdapPort                   : 389
Name                       : ADC
NTDSSettingsObjectDN       : CN=NTDS Settings,CN=ADC,CN=Servers,CN=Default-First-Site-Name,CN=Si
                             tes,CN=Configuration,DC=FINAL,DC=LOCAL
OperatingSystem            : Windows Server 2022 Datacenter
OperatingSystemHotfix      :
OperatingSystemServicePack :
OperatingSystemVersion     : 10.0 (20348)
OperationMasterRoles       : {}
Partitions                 : {DC=ForestDnsZones,DC=FINAL,DC=LOCAL,
                             DC=DomainDnsZones,DC=FINAL,DC=LOCAL,
                             CN=Schema,CN=Configuration,DC=FINAL,DC=LOCAL,
                             CN=Configuration,DC=FINAL,DC=LOCAL...}
ServerObjectDN             : CN=ADC,CN=Servers,CN=Default-First-Site-Name,CN=Sites,CN=Configurat
                             ion,DC=FINAL,DC=LOCAL
ServerObjectGuid           : 1706aeb3-0bc7-4fd7-ba72-3add255730e4
Site                       : Default-First-Site-Name
SslPort                    : 636
Now the data on the PDC is listened to (replicated) at the ADC and vice versa, and this is the basis of High Availability.
---
2. Organizational Structure :
- The second step is converting the servers into an actual company structure to meet the requirements:
From AD Users and Computers:
- I will create four departments (HR, Sales, Development, IT).
- Right-click on the domain itself to create an Organizational Unit under
FINAL.LOCAL. - I repeated this step for all four departments.
Creating Security Groups:
- Inside each OU, it is preferable to create a group to manage permissions easily:
- Go inside each OU -> Right-click -> New -> Group.
- I will name it in the format
Name_Group, and set the Scope type to Global.
Adding Users
To properly test the lab, we need at least one user in each department.
- Right-click inside the OU -> New -> User.
- After creating the user, right-click on it -> Add to a group, then type the group name for the department (e.g.,
HR_Group). - This is the structure I want to implement:
| Department (OU) | User Name | Security Group | Testing Purpose |
|---|---|---|---|
| IT | IT_Admin / IT_Support |
IT_Group |
Testing Remote Assistance and Full Access. |
| HR | HR_Manager / HR_Staff |
HR_Group |
Testing file deletion restriction and USB blocking. |
| Development | Dev_Lead / Dev_Dev1 |
Development_Group |
Testing Shared Folders and Task Manager restriction. |
| Sales | Sales_Rep1 / Sales_Rep2 |
Sales_Group |
Testing Quota (storage limits) and Printer Management. |
Now we will add the users to their respective groups, and I will do the following in each group:
- Right-click on the users.
- I selected Add to a Group.
- I typed the group name
HR_Groupand clicked OK. - I repeated this for every user in their respective department.
And now, to make sure everything is correct, I did a double check on the groups:
- I opened the properties of the group (
HR_Group) and checked the Members tab, and I should find all the assigned users there.
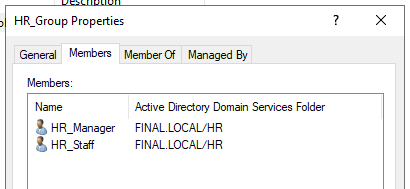
To check the settings :
PS C:\Users\Administrator> Get-ADGroup -Filter 'Name -like "*_Group"' | ForEach-Object {
>>     $group = $_.Name
>>     Get-ADGroupMember -Identity $_ | Select-Object @{N="GroupName";E={$group}}, Name, SamAccountName
>> } | Format-Table -AutoSize

GroupName         Name       SamAccountName
---------         ----       --------------
IT_Group          IT_Admin   IT_Admin
IT_Group          IT_Support IT_Support
Development_Group Dev_Lead   Dev_Lead
Development_Group Dev_Dev1   Dev_Dev1
Sales_Group       Sales_Rep1 Sales_Rep1
Sales_Group       Sales_Rep2 Sales_Rep2
HR_Group          HR_Manager HR_Manager
HR_Group          HR_Staff   HR_Staff

PS C:\Users\Administrator>
At this point, we have verified that each user is inside their correct group before proceeding with anything else.
---
3. Security Policies (GPO) :
We will start with the Policies, first the Password and Lockout.
In Active Directory, Account Policies such as password and lockout must be applied at the domain level, which is why we modify them in the Default Domain Policy.
- From Server Manager, I opened Tools and selected Group Policy Management.
- I expanded the Forest and the Domain until I reached Default Domain Policy, then right-clicked on it and selected Edit.
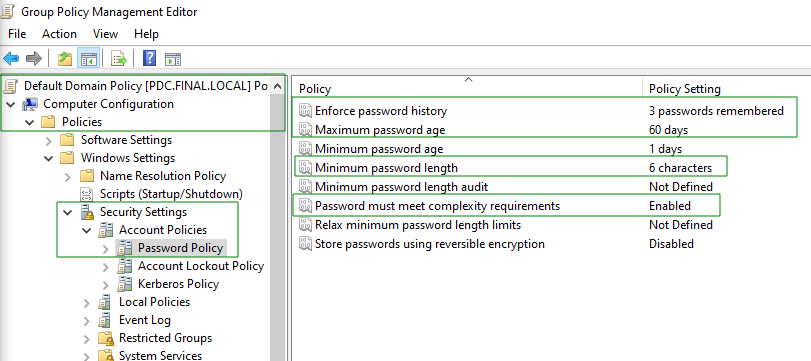
- To configure the Password Policy:
- From the path:
Computer Configuration>Policies>Windows Settings>Security Settings>Account Policies>Password Policy
- Then I applied the following:
- Enforce password history: set it to 3 passwords remembered.
- Maximum password age: set it to 60 days.
- Minimum password length: set it to 6 characters.
- Password must meet complexity requirements: set it to Enabled.
- From the path:
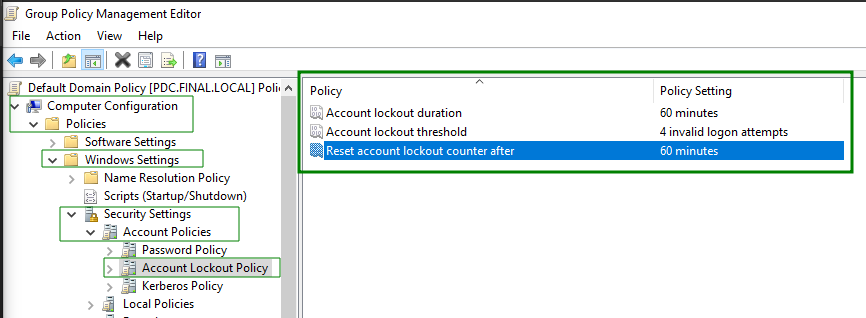
Configuring the Account Lockout Policy:
- Account lockout threshold: set it to 4 invalid logon attempts (if the user enters the wrong password 4 times, the account will be locked).
- Account lockout duration: set it to 60 minutes (a full hour as required).
- Reset account lockout counter after: set it to 60 minutes.
---
4. Remote Access Configuration :
Now we want to apply requirement number 4 so that the IT team can assist employees:
Enabling Remote Desktop via GPO
Instead of configuring each machine one by one, we will apply it once:
- I opened Group Policy Management.
- Right-clicked on the domain
FINAL.LOCALand selected Create a GPO in this domain, and Link it here. - Named it "RemoteAccessGPO".
- Right-clicked on it and selected Edit.
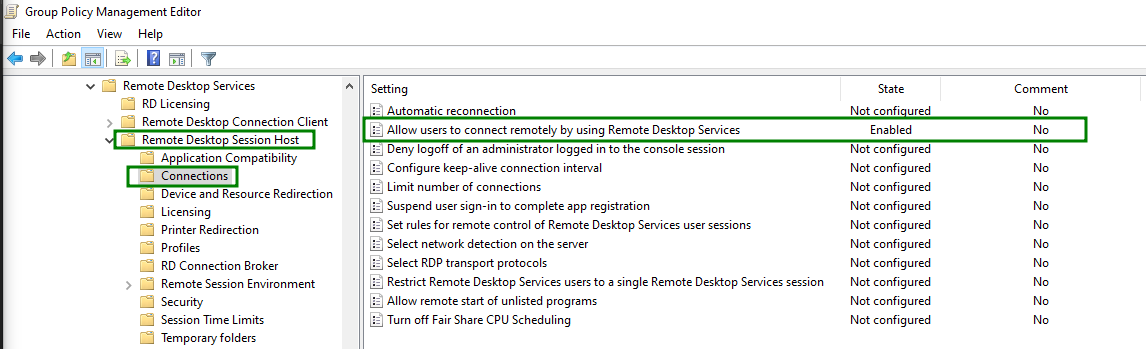
- Follow this path:
Computer Configuration>Policies>Administrative Templates>Windows Components>Remote Desktop Services>Remote Desktop Session Host>Connections.- Opened Allow users to connect remotely by using Remote Desktop Services
- Set it to Enabled.
Enabling Remote Assistance and Assigning IT as Helpers
In the same GPO, follow this path:
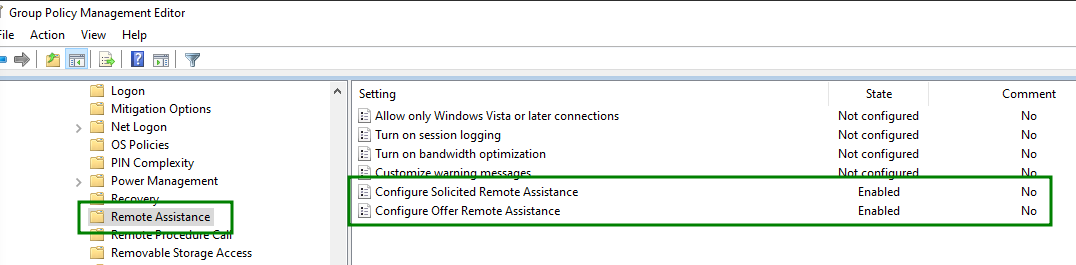
Computer Configuration > Policies > Administrative Templates > System > Remote Assistance
- Open Configure Solicited Remote Assistance and set it to Enabled.
-
Open Configure Offer Remote Assistance and set it to Enabled.
- Click on Show (under Helpers) and enter your group name:
FINAL\IT_Group.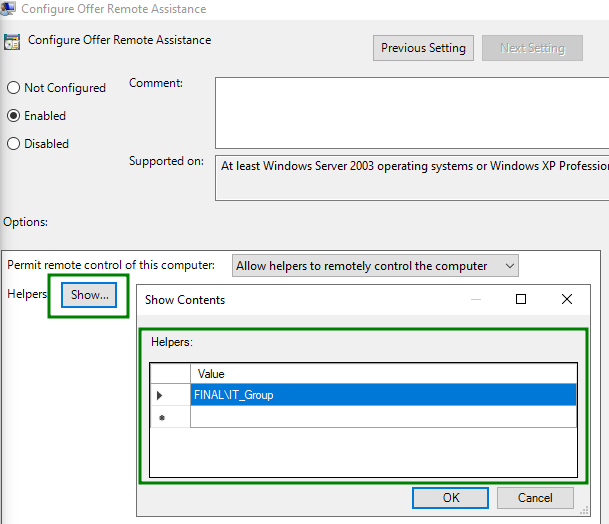
Any user inside the IT group is allowed to initiate remote access and assist other users.
- Click on Show (under Helpers) and enter your group name:
-
Remote Assistance requires a “rule” in the employees’ firewall to allow IT access. Since we are using GPO, we will handle it here:
-
In the same GPO Editor, I opened:
Computer Configuration>Policies>Windows Settings>Security Settings>Windows Defender Firewall with Advanced Security.
- Right-clicked on Inbound Rules and selected New Rule.
- Chose Predefined.
- From the list, selected Remote Desktop and completed the wizard (Allow the connection).
- I repeated the same steps and tried to select Remote Assistance, but it was not available, so we did the following:
- Opened Server Manager and clicked Manage -> Add Roles and Features, then continued until reaching Features.
- Searched for Remote Assistance, ensured it was checked, installed it, and performed a restart.
- In the same GPO Editor, I opened:
Computer Configuration>Policies>Windows Settings>Security Settings>Windows Defender Firewall with Advanced Security.
- Right-clicked on Inbound Rules and selected New Rule.
- Chose Predefined.
- From the list, selected Remote Assistance and completed the wizard (Allow the connection).
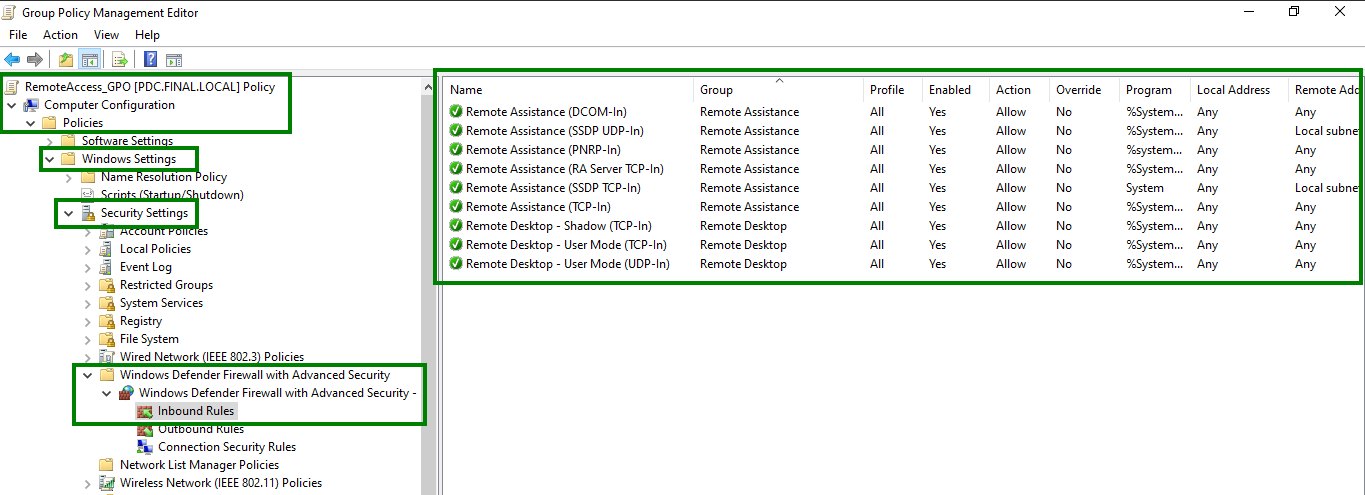
At this point, the Firewall Rules for Remote Desktop and Remote Assistance have been successfully applied.
---
5. User Restrictions (GPO) :
Before leaving Group Policy, we still have “User Restrictions” to secure the lab.
Requirements:
- Block USB (External Storage).
- Disable Task Manager.
-
Disable Control Panel.
-
I will create a new GPO called "SecurityRestrictionsGPO" and link it to the domain
FINAL.LOCAL. -
I want these policies to be applied to everyone except IT, and at the same time, if new OUs are added later, they should automatically inherit these settings without modifying our configuration. So, in this case, I will use Security Filtering.
-
I created the SecurityRestrictionsGPO, then clicked on it. On the right side, there is a section called Security Filtering, which contains Authenticated Users (meaning all users). I will remove Authenticated Users and instead click ADD to include only the specific groups I need, like this:
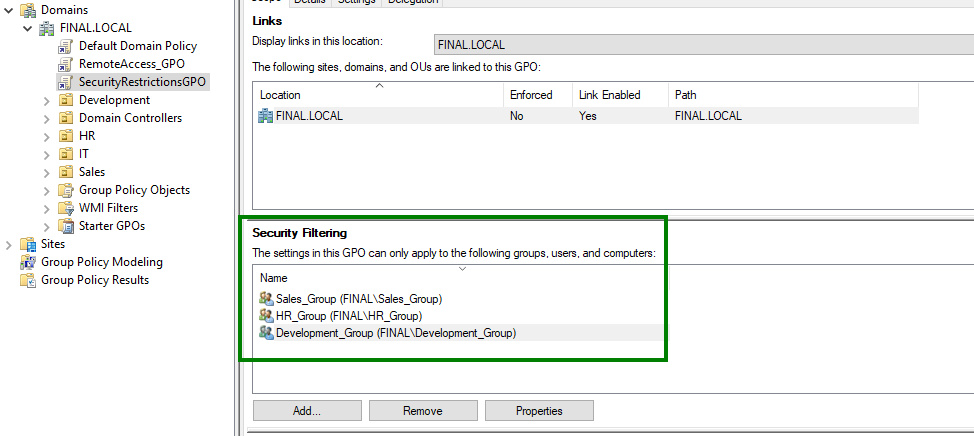
And now the GPO is linked to the domain, but Windows will only apply it to the members of these groups, while ignoring the IT group. If new groups are added later, nothing complex is needed—just simply add them here.
After that, I clicked Edit on this GPO:
- To block USB (at the computer level):
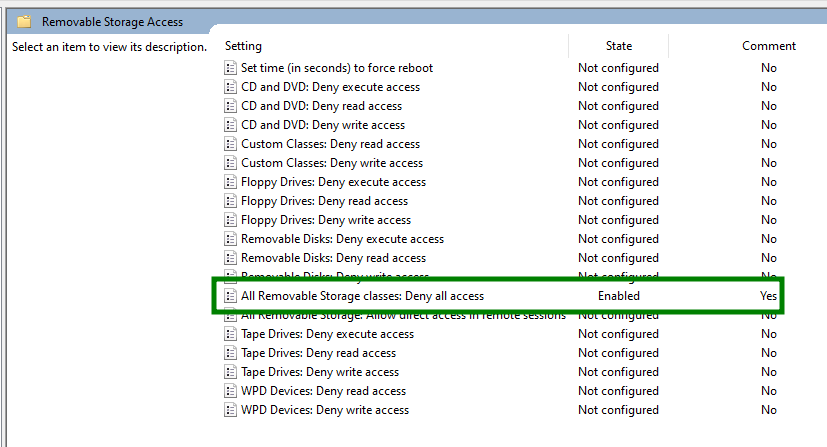
Computer Configuration>Policies>Administrative Templates>System>Removable Storage Access- I enabled the following option:
- All Removable Storage classes: Deny all access.
- All Removable Storage classes: Deny all access.
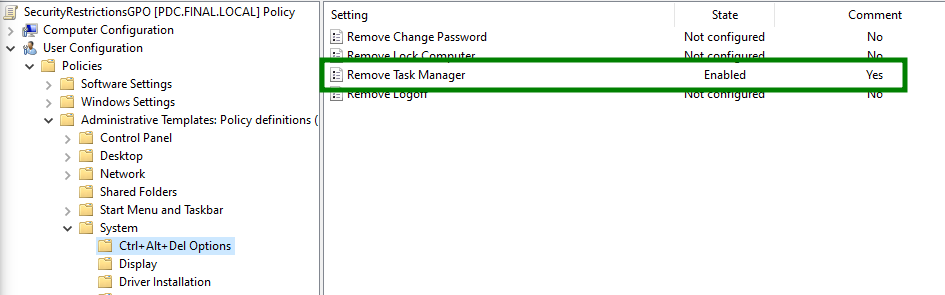
To disable Task Manager (at the user level):
-
User Configuration>Policies>Administrative Templates>System>Ctrl+Alt+Del Options -
I enabled the following option: - Remove Task Manager.
-
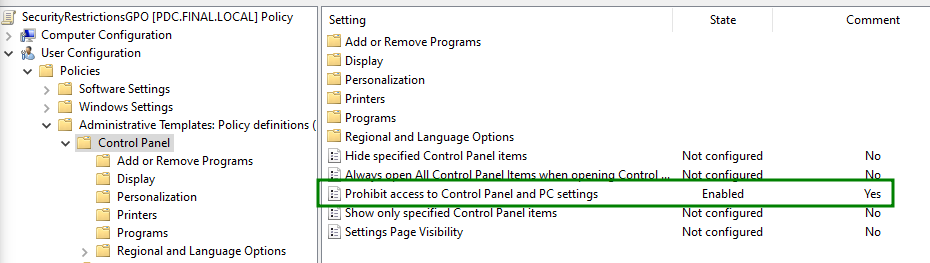
To disable Control Panel (at the user level):
User Configuration>Policies>Administrative Templates>Control Panel- I enabled the following option:
- Prohibit access to Control Panel and PC settings.
- Prohibit access to Control Panel and PC settings.
---
Verifying GPO Execution:
- Before applying changes:
gpupdate /force
- Verifying the Password Policy:
PS C:\Users\Administrator> Get-ADDefaultDomainPasswordPolicy

ComplexityEnabled           : True
DistinguishedName           : DC=FINAL,DC=LOCAL
LockoutDuration             : 01:00:00
LockoutObservationWindow    : 01:00:00
LockoutThreshold            : 4
MaxPasswordAge              : 60.00:00:00
MinPasswordAge              : 1.00:00:00
MinPasswordLength           : 6
objectClass                 : {domainDNS}
objectGuid                  : 8d625e44-0912-4e1a-9d65-135306d5ce06
PasswordHistoryCount        : 3
ReversibleEncryptionEnabled : False

PS C:\Users\Administrator>
- To verify GPO linking status:
Get-GPOReport -All -ReportType HTML -Path "C:\GPO_Report.html"
This is to confirm that the GPO is actually linked to the domain or OU.
After running gpupdate /force, to ensure the settings are truly applied:
gpresult /r
The results here show the current state report, which tells what Windows sees and what is actually applied on the server.
All results confirm that the required configurations have been successfully implemented.
---
6. DHCP Configuration :
First, I will install the Role on both PDC and ADC servers:
The service must be installed on both machines before we configure them together.
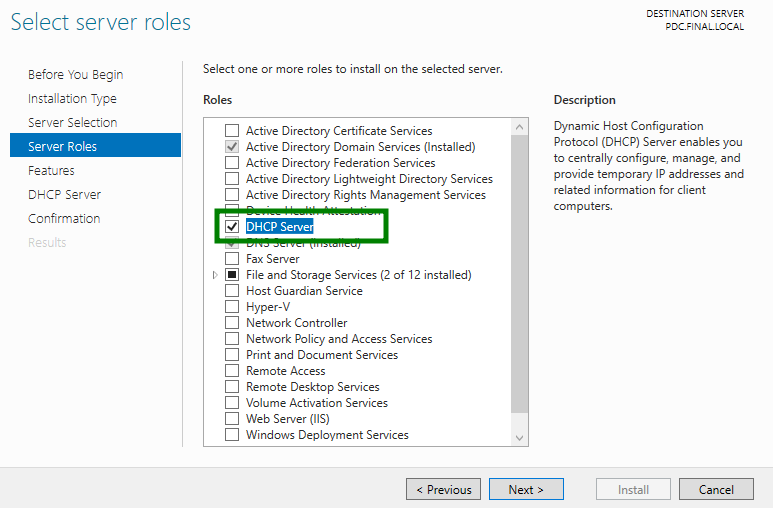
- I opened Server Manager on both servers.
- Clicked on Manage -> Add Roles and Features.
- Selected DHCP Server and clicked Next until the installation completed.
- After installation, a yellow triangle (Notifications) appears at the top. I clicked on it and selected Complete DHCP Configuration.
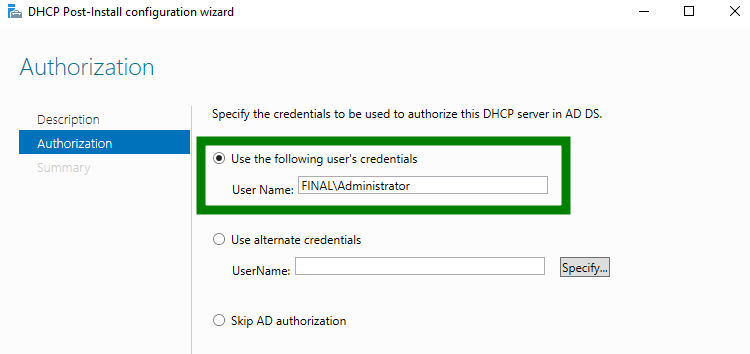
I clicked Commit then Close. (This step authorizes the server in Active Directory).
Configuring the Scope (on the PDC only):
The scope is the range of IP addresses that will be distributed, and we will create it on the primary server, which will then automatically relay to the additional server.
- From the PDC, I opened Tools -> DHCP.
- Expanded the arrow next to the server name, then right-clicked on IPv4 and selected New Scope.
- Name: I named it
FINAL_SCOPE. -
IP Address Range:
- Start IP:
192.168.56.40 - End IP:
192.168.56.230 - Length:
24(Subnet Mask:255.255.255.0).
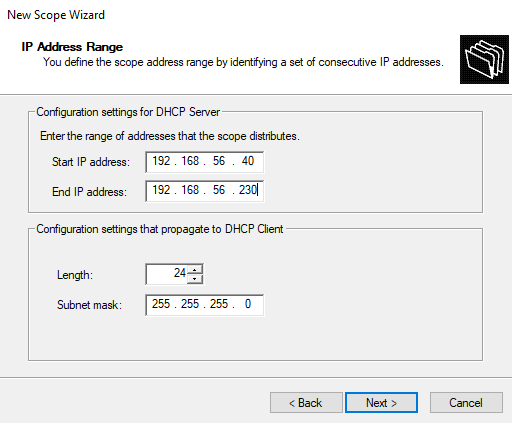
- Start IP:
Add Exclusions: (the IP addresses we do not want to be assigned):
- Start:
192.168.56.80 -
End:
192.168.56.85then I clicked Add.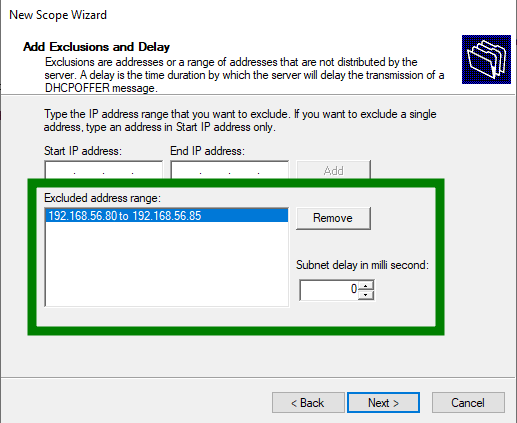
-
Lease Duration: Change the Days to 10 days.
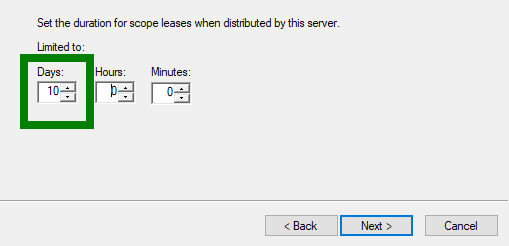
-
Configure DHCP Options: I selected Yes, I want to configure these options now.
- Router (Default Gateway): I entered
192.168.56.1and clicked Add.
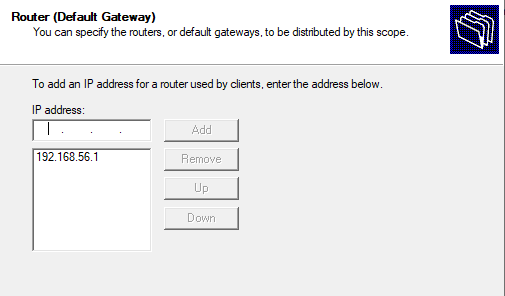
- Router (Default Gateway): I entered
-
DNS Server: I made sure that my IPs are added (
192.168.56.10and192.168.56.11).- Preferred DNS server: I left it as
127.0.0.1(so it can resolve itself first). - Alternate DNS server: I entered the second server (ADC) IP:
192.168.56.11.
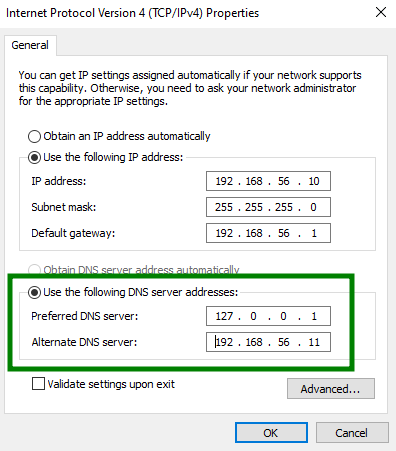
- Preferred DNS server: I left it as
-
At the same time, I went to the ADC, which has the IP
192.168.56.11, and did the opposite configuration:- Preferred DNS: set it to
127.0.0.1. - Alternate DNS: set it to
192.168.56.10(the PDC).
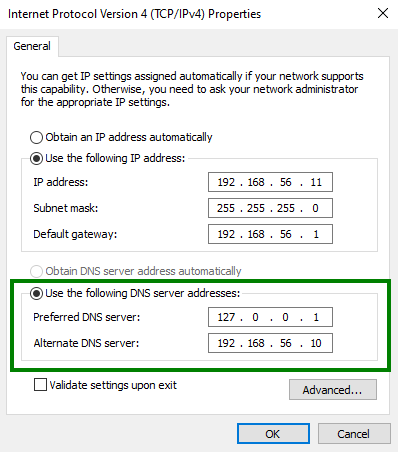
- Preferred DNS: set it to
-
Here, I added the ADC in the IP address field:
192.168.56.11then clicked Add.- Then we wait a few seconds for Windows to validate it.
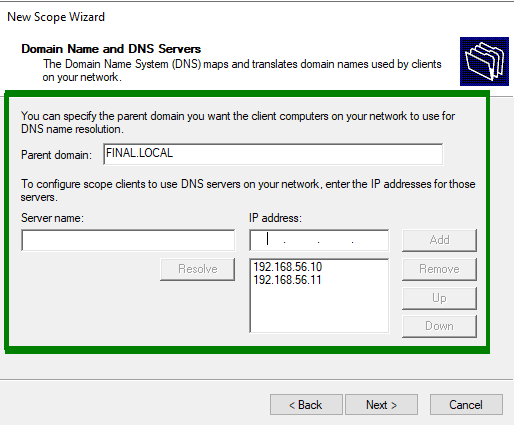
-
And then here we will click Next in the
WINS Serversscreen: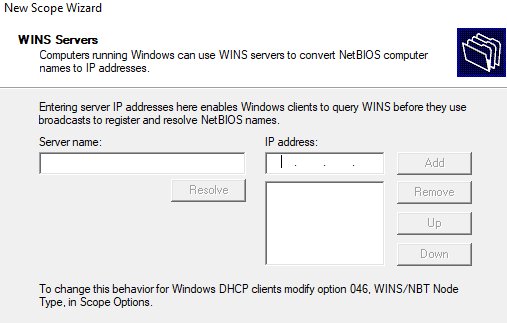
The WINS Servers is a very old technology that was used to resolve computer names into IP addresses before DNS became the standard. Since we are working with modern DNS on Windows Server 2022, there is no need to configure anything here.
-
The Activate Scope window appeared, so I selected Yes, I want to activate this scope now
- (so it can start distributing IP addresses immediately).
- I clicked Next and then Finish.**
Configuring Failover (Linking with ADC):
This is the step that allows both servers to communicate with each other.
- From the same DHCP console on the PDC.
- Right-click on the newly created scope (
FINAL_SCOPE) and select Configure Failover. -
Click Next, and in the Partner Server section:
- In the small Add Server window that appears, select the server:
adc.final.local(with IP192.168.56.11). - I clicked OK.
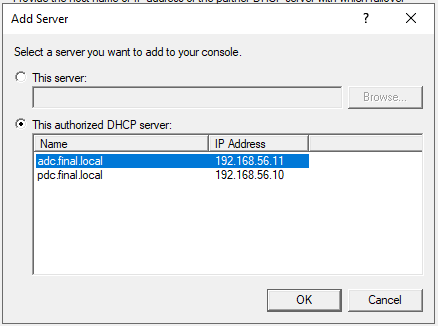 - Then I clicked Next.
 - In the small Add Server window that appears, select the server:
-
In the Create a new failover relationship screen:
-
This is the final step to link both servers (DHCP Failover). This screen defines the “password” that both servers will use to trust each other and exchange data.
- Mode: I set it to Load Balance (so they split the workload 50/50).
- Shared Secret: I entered a password for the relationship (for example
P@$$w0rd).
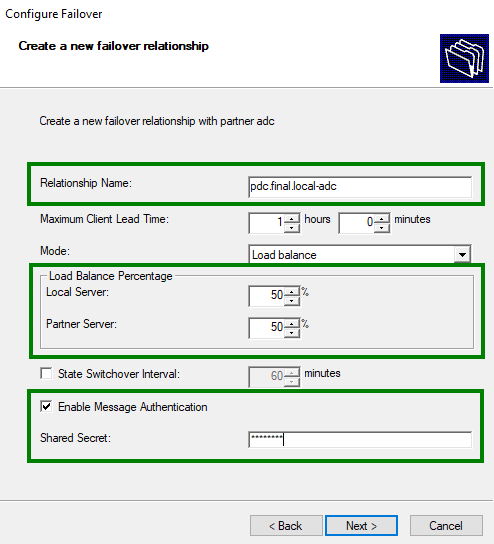
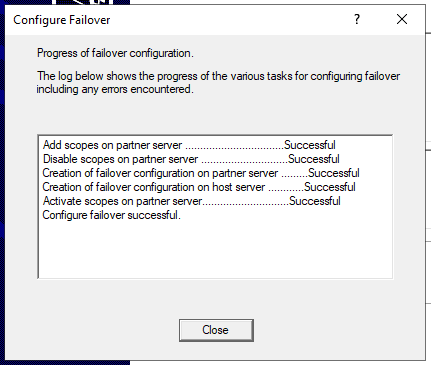
The DHCP Failover worked at 100%, and the two servers (PDC and ADC) are now "working together" in distributing IPs:
-
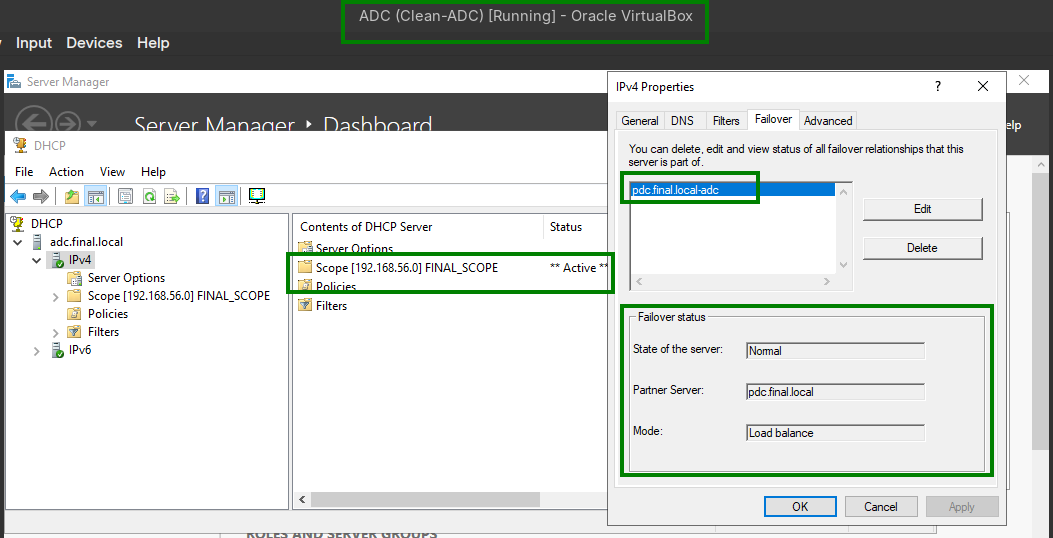
After clicking Finish, to verify:
- I went to the ADC (the additional server).
- Opened the DHCP console.
- Right-clicked on IPv4 and selected Refresh.
 - The
- The FINAL_SCOPEappeared on the ADC automatically with all the settings configured on the primary server. - Scope Status: TheFINAL_SCOPEis present and shows as Active, which means the replication from the primary server was successful. - Failover Status: The status showsNormaland the partner ispdc.final.localin Load Balance mode. This means both servers now see each other and are working as a single system.
---
7. DNS & Load Balancing
The idea here is that we will make the website name www.final.local point to both of our servers (192.168.56.10 and 192.168.56.11) using a method called Round Robin. This means that when someone requests the website, DNS will return the first server’s IP, and the next request will return the second server’s IP, and so on.
🌍 DNS Load Balancing Configuration Steps:
Do the following from the PDC server:
- Open the tool: From Server Manager, click Tools then DNS.
- Go to the zone: Expand the server name
PDC-> then Forward Lookup Zones -> open the zone namedFINAL.LOCAL. -
Add the first record:
- Right-click in an empty area and select New Host (A or AAAA).
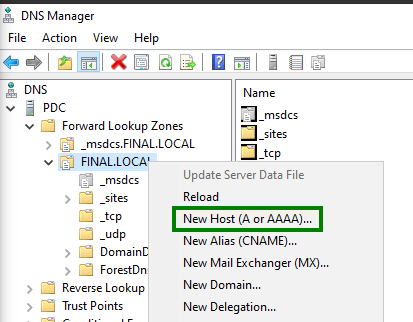
- Right-click in an empty area and select New Host (A or AAAA).
-
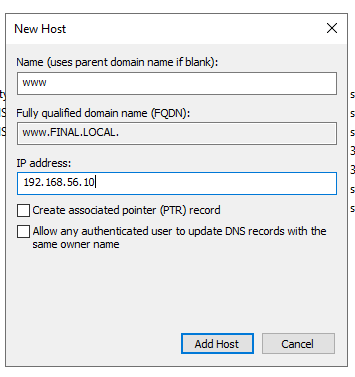
In the Name field, I entered:
www. - In the IP address field, I entered:
192.168.56.10. - I clicked Add Host.
-
Adding the second record (with the same name):
-
In the same window (or by right-clicking and selecting New Host again):
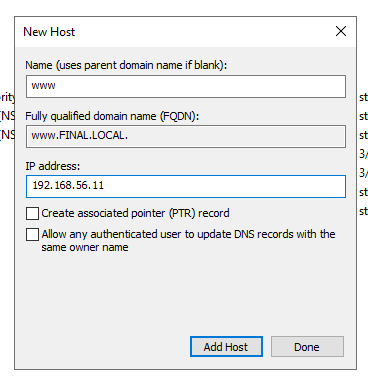
- In the Name field, I also entered:
www. - In the IP address field, this time I entered:
192.168.56.11. -
I clicked Add Host.
Verifying Round Robin is enabled:
By default, Windows Server enables this feature, but we will verify it:
- Right-clicked on the server name (
PDC) in the DNS console and selected Properties. - Opened the Advanced tab.
- Made sure that Enable round robin is checked ✅.
Testing via CMD (fastest and most accurate method):
In CMD:
C:\Users\Administrator>nslookup www.final.local
DNS request timed out.
    timeout was 2 seconds.
Server:  UnKnown
Address:  ::1

Name:    www.final.local
Addresses:  192.168.56.11
          192.168.56.10

C:\Users\Administrator>
The appearance of both addresses means that DNS understands that this name has two sources, and it will distribute requests between them.
---
Web Server (IIS) & High Availability
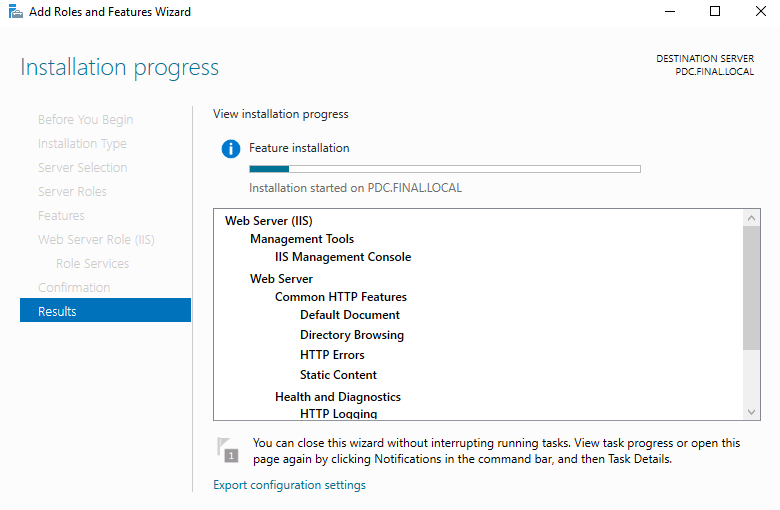
Installing the Web Server (IIS) on PDC and ADC
(I performed these steps on the PDC and repeated them on the ADC)
- Open Server Manager.
- Click Add Roles and Features.
- Click Next until reaching the Server Roles screen.
- Check Web Server (IIS). A small window will appear, click Add Features.
- Continue clicking Next until the end without changing any other settings, and finally click Install.
Customization to verify Round Robin
To know which server you are hitting when opening the website, we need to modify the default page on each server:
On the PDC server:
- Go to the path:
C:\inetpub\wwwroot. - Locate the file named
iisstart.htm. - Right-click it -> Open with -> Notepad.
- Edit it so that the page displays the PDC server identifier, e.g., change the code to:
<div class="server-box">SERVER: PDC</div>
On the ADC server:
- Repeat the same steps exactly, but change the line to:
<div class="server-box">SERVER: ADC</div>
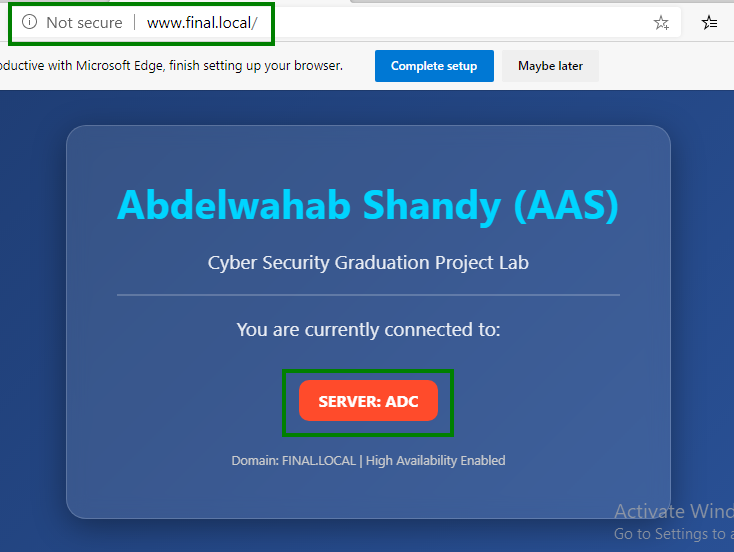
Verification Phase:
Now it’s time to enjoy the result of your work:
- Open a browser (Edge) from any device (PDC or Client).
- Type in the address:
http://www.final.local. - The server page should open (e.g., PDC).
- Refresh the browser several times, or open the site from another device on the network.
- The surprise: DNS will rotate the requests to the ADC, and you’ll see the line change to:
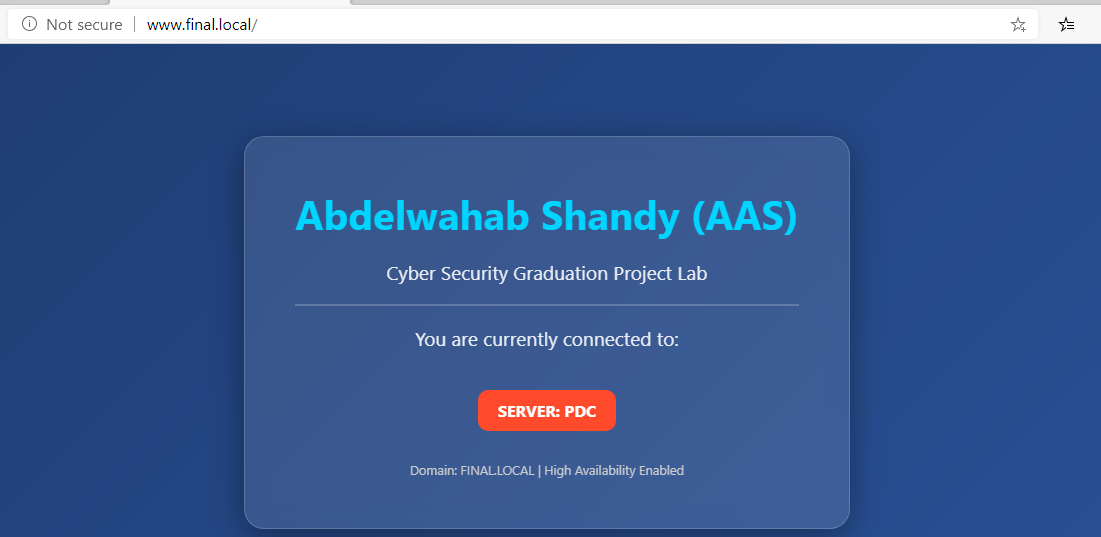
When I completely shut down the PDC (Shut down) and tried to open the site from the client, I found that it opened normally through the ADC. That's how I actually achieved High Availability.
---
9. File Server & Permissions :
Since we have “finalized” the Web and infrastructure, it’s time to secure the company files. The requirement now:
1. Creating the Shared Folder (on the PDC):
- Open the C partition and create a folder named
FinalProject. - Right-click on it -> Properties -> Sharing -> Advanced Sharing.
- Enable Share this folder and click Permissions.
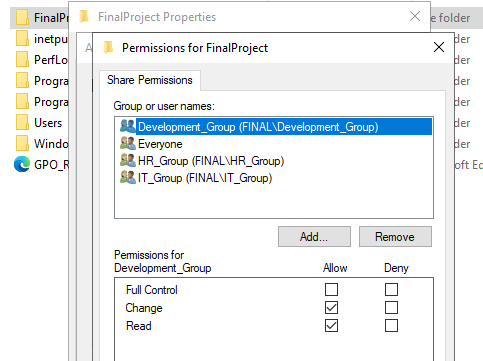
- Set
Everyoneto have Read permission only:
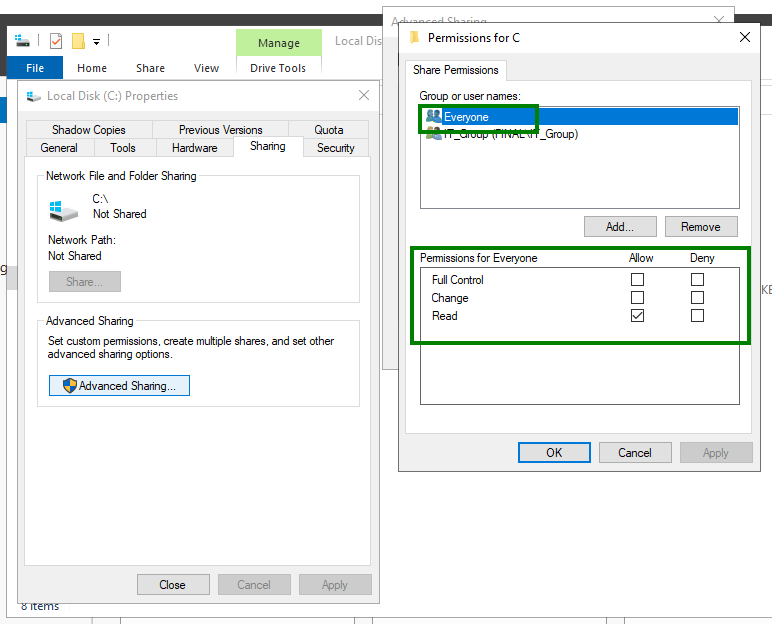
- The function of the
IT Groupand its Full Control function:
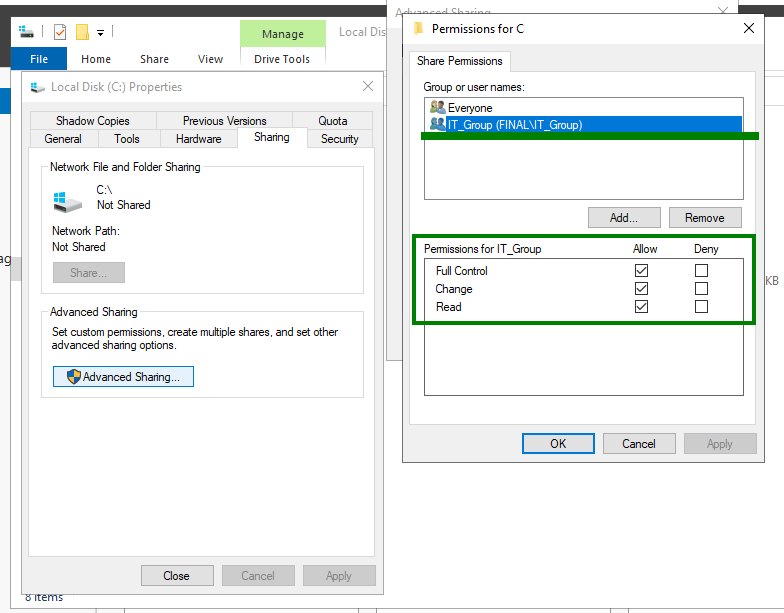
- I added the
HR_GroupandDev_Groupand gave them Change and Read:
2. Preventing Delete (NTFS Advanced Permissions):
To execute the (Allow: Edit / Deny: Delete) request:
-
From the same Properties window, go to the Security tab.
-
Click Advanced.
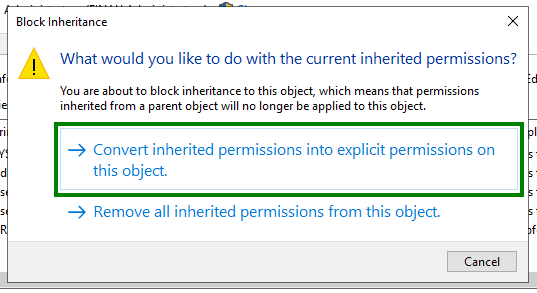
-
Click Disable inheritance and select the first option (Convert...) to manually control the permissions.
-
Add the HR group and click Edit.
-
Click on Show advanced permissions (very important).
-
Settings:
-
Leave all options checked (Read, Write, Create).
-
Uncheck the boxes next to:
DeleteandDelete subfolders and files.
-
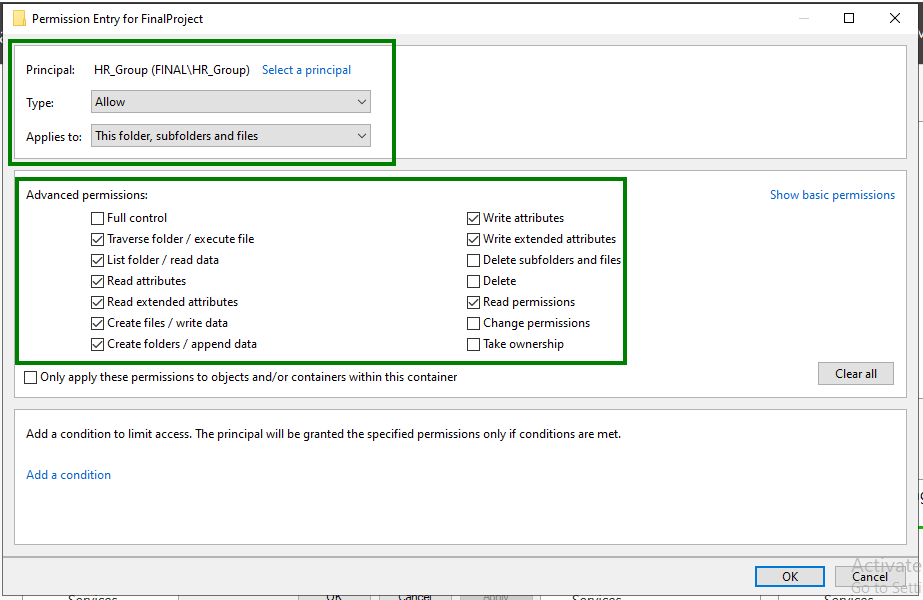
- I pressed OK and repeated this with the required groups (Development_Group and Sales_Group):
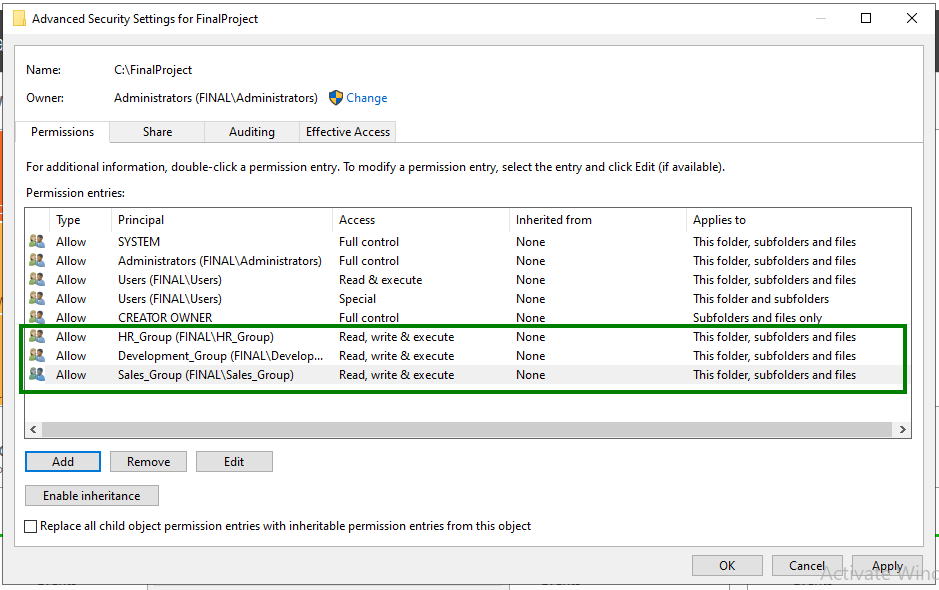
This means that the Development_Group, Sales_Group, and HR_Group will be able to upload and modify files, but if anyone tries to delete a colleague’s file, Windows will display “Access Denied”.
3. Preventing Upload of Dangerous Files (File Screening):
We want to prevent employees from uploading:
- Executable files (.exe) to protect against viruses.
- Audio & video files (Audio & Video) to preserve server storage.
We need a tool called FSRM, which requires installing the Role:
- From Server Manager -> Add Roles and Features.
- I went to File and Resource Manager -> File and iSCSI Services.
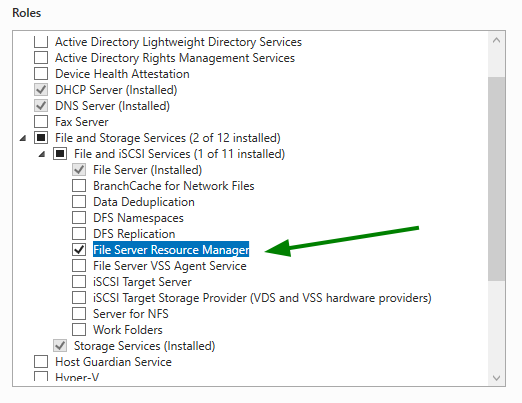
- I checked File Server Resource Manager and installed it.
Configuring the restriction:
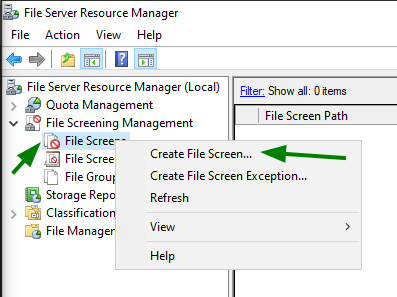
- I opened the tool from Tools -> File Server Resource Manager.
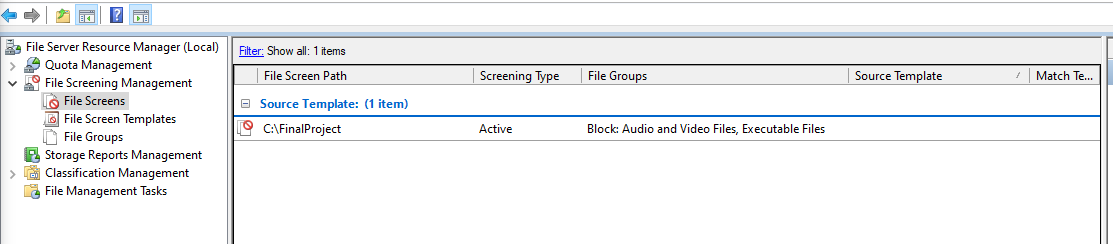
- From the left menu, I opened File Screening Management -> then File Screens.
- Right-clicked in the middle and selected Create File Screen.
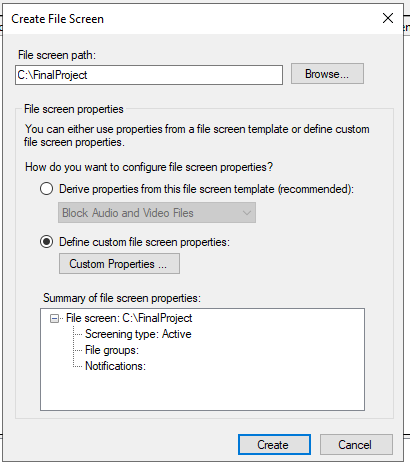
- In File screen path, I selected the folder
C:\Final_Project.
-
Under the options, I selected:
- Block Audio and Video Files.
- Block Executable Files (to prevent
.exefiles).
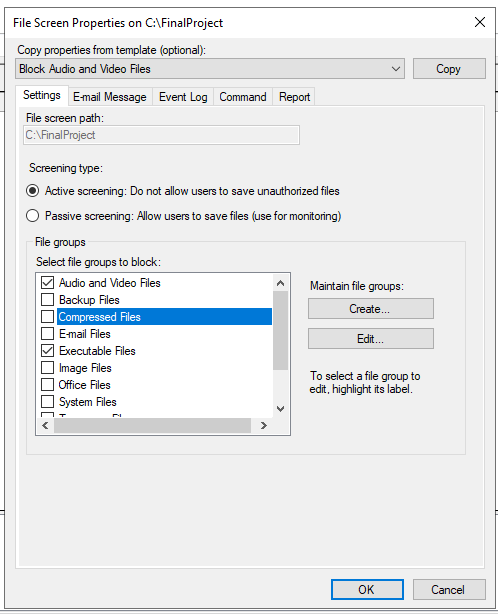
Create.
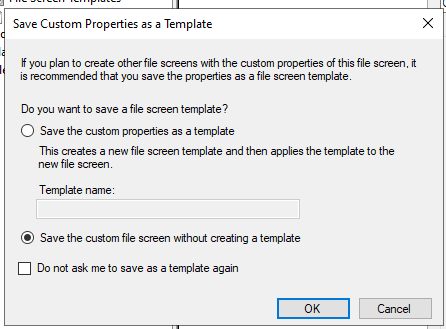
- A prompt will appear asking: “Do you want to save these custom settings as a template?”
- I selected Save the custom file screen without creating a template.
Let’s verify the setup:
From the server itself:
- I named the file
test.mp3ortest.exe.
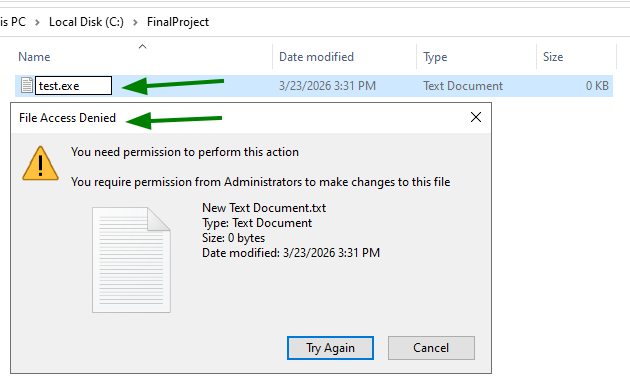
- And with that, we have applied the policy to the folder to ensure it remains free from any unauthorized files or viruses.
- Also, even the admin must comply with storage security standards and prevent Shadow IT.
---
10. Network Drives :
Creating the Public Share:
- On the PDC, I opened
C:\and created a new folder namedPublicShare. - Right-clicked -> Properties -> Sharing -> Advanced Sharing.
- Enabled sharing and went to Permissions: set
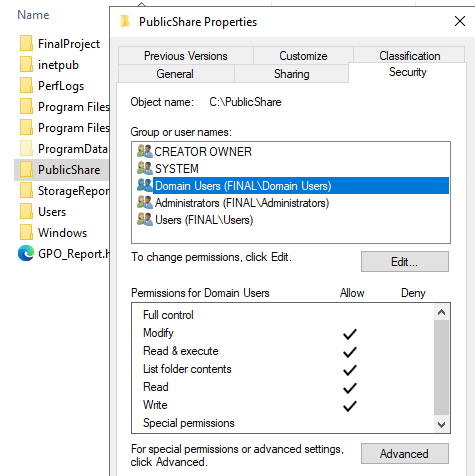
Everyoneto have Full Control (because NTFS permissions will control access later). - Then I went to the Security tab (NTFS Permissions):
- Added the
Domain Usersgroup. - Granted them Modify permission (so they can create and edit files as required).
- Added the
Setting Storage Limit (2GB Quota):
- I opened File Server Resource Manager from the Tools menu.
- From the left panel, I selected Quota Management -> then Quotas.
- Right-clicked in the middle -> Create Quota.
- In the Quota path, I selected the
Public_Sharefolder that we just created. - Under Template, I chose 2 GB Limit and set it as a Hard Quota.
- Clicked Create.
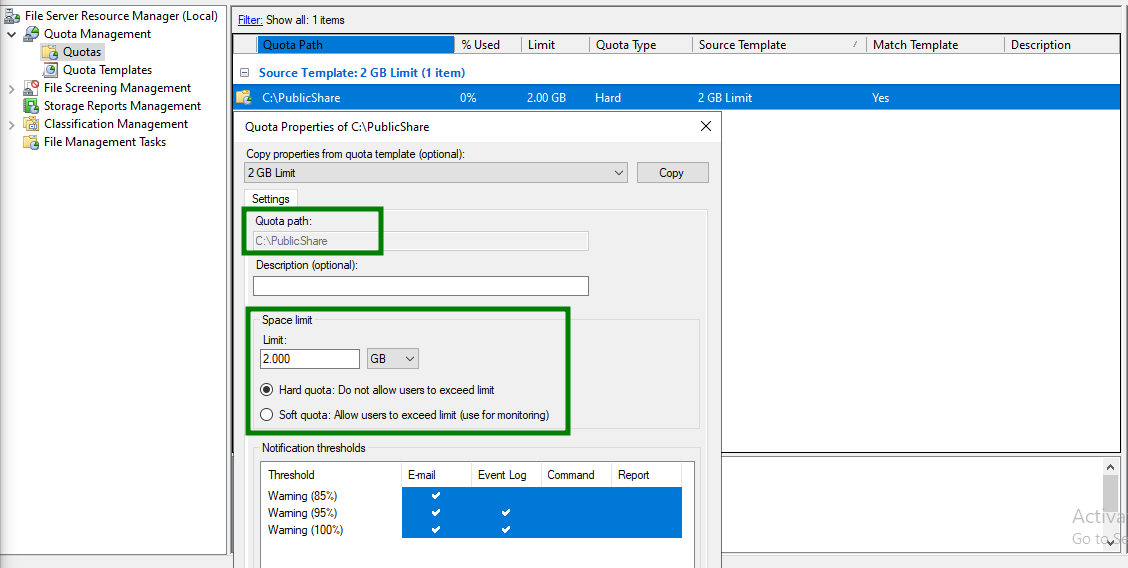
Mapping the Network Drive:
To make the folder automatically appear for users in This PC:
- Opened Group Policy Management.
- Right-clicked on FINAL.LOCAL (the domain itself) and selected Create a GPO in this domain, and Link it here... and named it
MapPublicDrive. - Right-clicked on the new GPO -> Edit.
- Went to the following path:
User Configuration->Preferences->Windows Settings-> Drive Maps.
- Right-clicked in the middle -> New -> Mapped Drive.
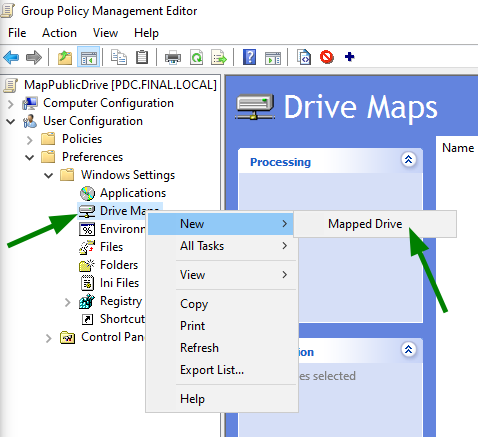
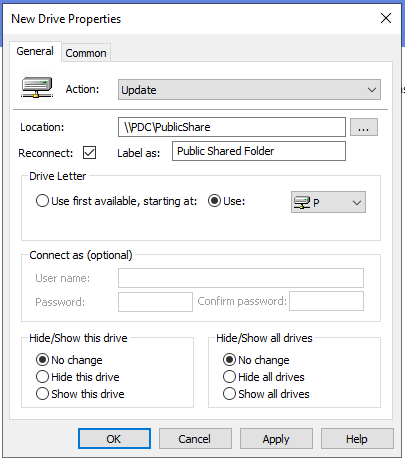
- Action: Update
- Location:
\\PDC\PublicShare - Drive Letter: She chose the letter P: (to stand for Public).
- Label: She wrote
Public Shared Folder.- Check mark for Reconnect.
Then I went to the Common tab next to the General tab at the top:
- **
Run in logged-on user's security context (user policy option)
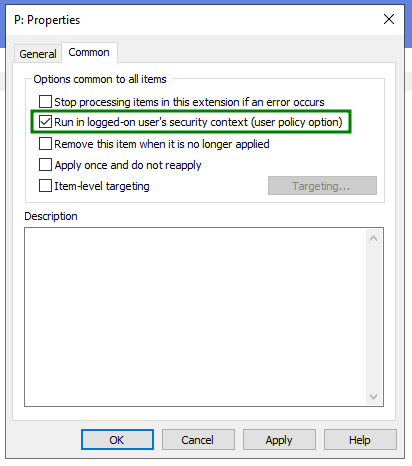
This ensures that the GPO works with the privileges of the user who logs in and that the drives appear without problems.
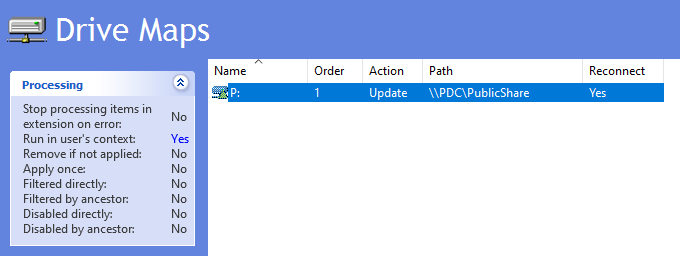
That's perfect :)
---
11. Printer Management
Manage consumables (such as ink and paper) and define official working hours for printing:
Steps to implement Printer Management on the PDC:
Adding and configuring the Print Server Role:
Before anything, we need to make sure the server is ready to manage printers:
- From Server Manager -> Add Roles and Features.
- Select Print and Document Services and install it (default settings are fine).
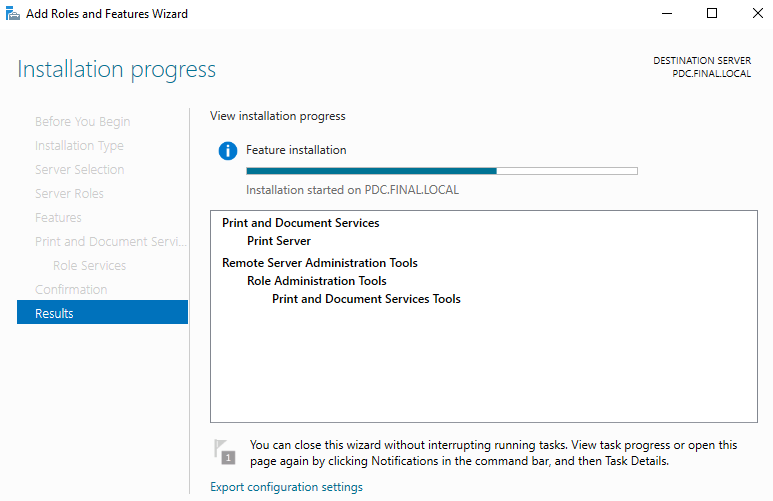
After installation, I opened the tool from Tools -> Print Management.
Adding a Dummy Printer:
Since we don’t have a real printer, we will create a virtual one to apply policies on it:
- In Print Management, expand Print Servers -> your server name -> Printers.
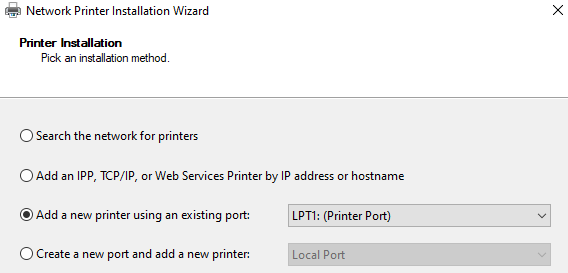
- Right-click in the middle and select Add Printer.
- Choose Add a new printer using an existing port (leave it as LPT1 for example).
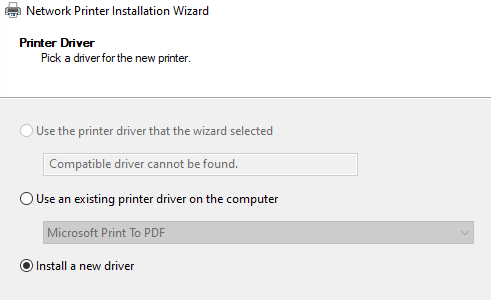
Because this is a new printer:
- Select any common printer driver (e.g., HP LaserJet Series).
- Name it
Office_Printer_BW. - Very important: check Share this printer.
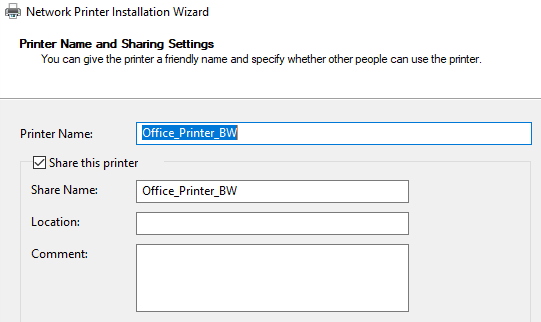
Configuring Restrictions (Black & White & Time)
Setting Available Time (9:00 AM → 4:00 PM)
- Right-click on the printer you created -> Properties.
- Go to the Advanced tab.
- Select Available from and set the time:
- From: 9:00 AM
- To: 4:00 PM
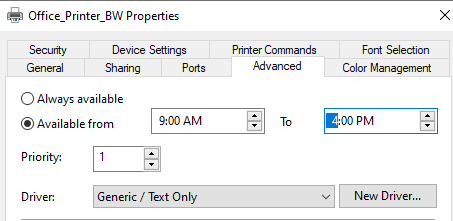
This means that if an employee tries to print at 5 PM, the job will remain in a Pending state until the next morning.
Second: Enforcing Black & White Printing (B&W Only)
- From the same Properties window, go to the General tab.
- Click on Preferences (or Printing Preferences).
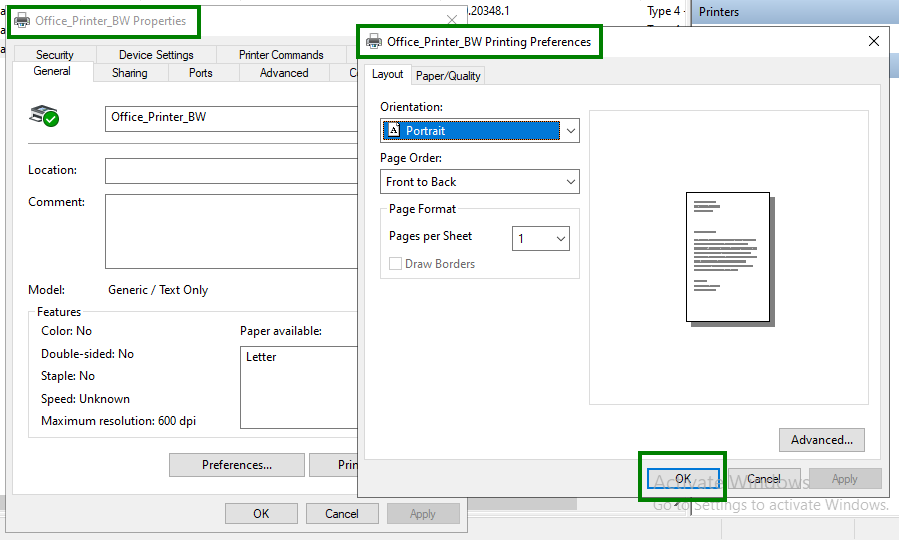
Since the driver is
Generic / Text Only, this ensures that printing is forced to be Black & White (B&W) for all users.
Deploying the Printer
To make the printer automatically appear for users (just like we did with Network Drives):
- I went to the main Print Management console.
- Right-clicked on the
Office_Printer_BWprinter. - Selected Deploy with Group Policy.
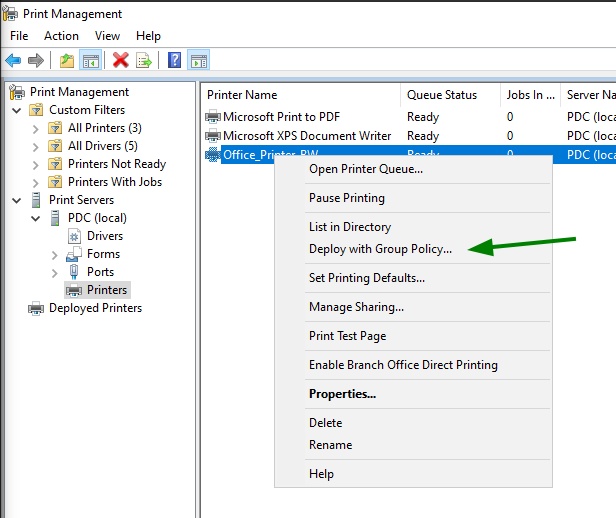
- I clicked Browse and selected the GPO we created earlier named:
PrintersPolicy. -
I checked both boxes:
-
The users that this GPO applies to -
The computers that this GPO applies to
-
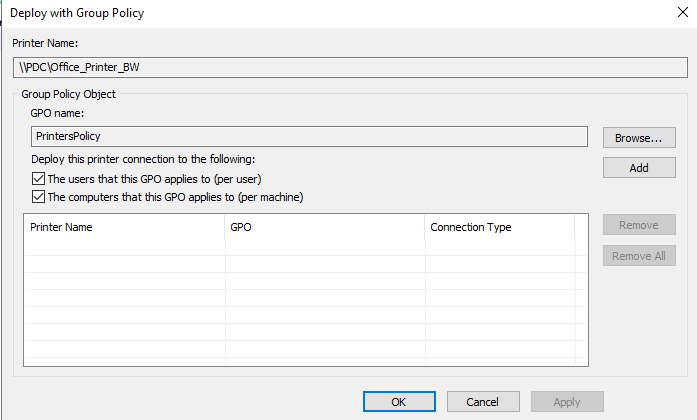
Don't forget "Add" I clicked Add then OK.
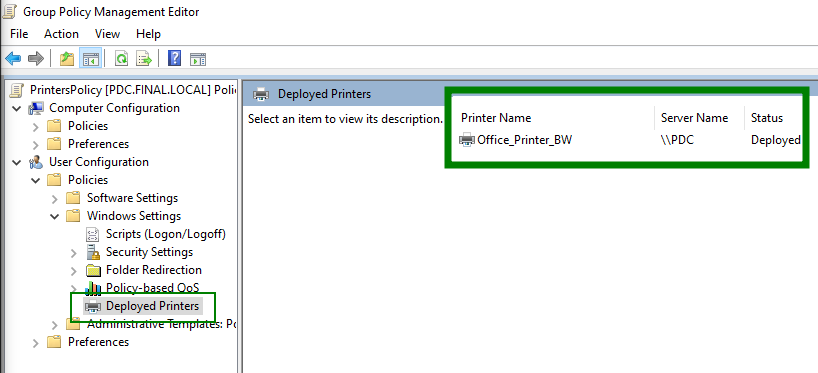
After that, from Group Policy Management:
I selected the GPO named Printers_Policy, then went to:
User Configuration -> Policies -> Windows Settings
---
12. Active Directory Features :
- Enable Active Directory Recycle Bin
The Active Directory Recycle Bin is a “lifeline” for any Admin.
If you accidentally delete a user or group, this feature allows you to restore it with all its data and permissions (Group Membership) with a single click, without needing to restore the entire database.
From the PDC:
- I opened Server Manager.
- From the Tools menu, I selected Active Directory Administrative Center.
- From the left panel, I clicked on my domain name (final (local)).
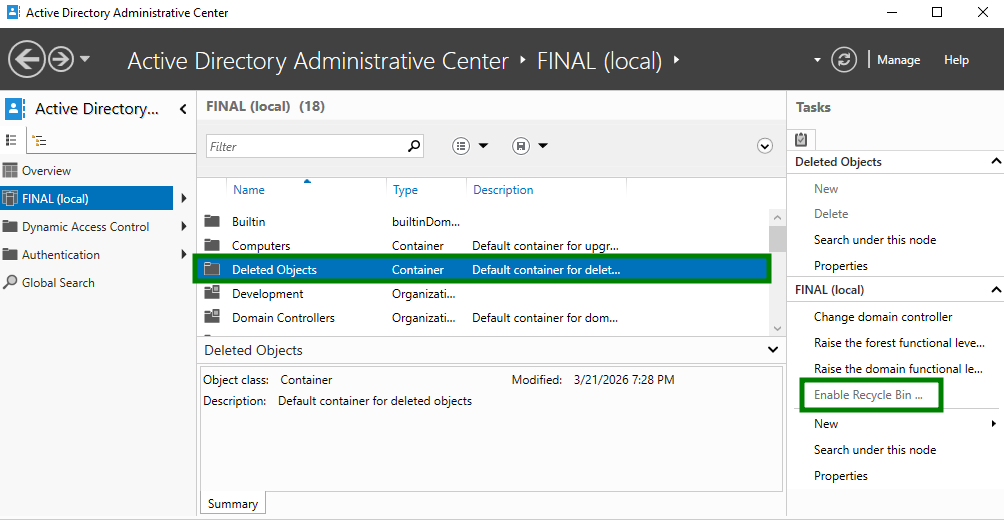
- On the far right under the Tasks section, I selected:
Enable Recycle Bin....
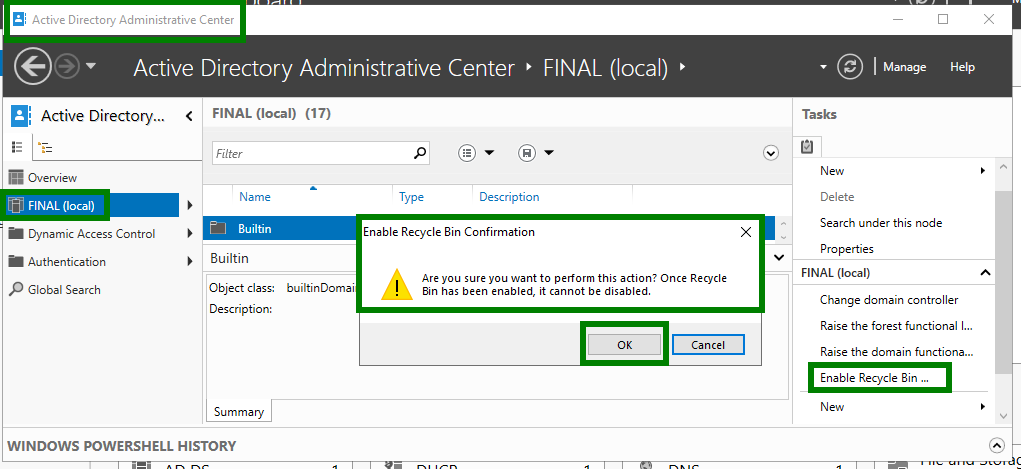
- Click on it, and a warning message will appear telling you that “activation is final and cannot be cancelled” (which is what is required). Click OK.
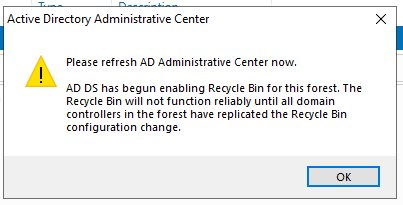
- A message saying that the change will take time to be heard in the ADC (Additional Domain Controller). Click OK.
Are you sure it did?
-
In the same Active Directory Administrative Center tool.
-
I did Refresh.
-
A new folder appeared under the domain name called
Deleted Objects.
---
13. Virtualization Infrastructure :
Hyper-V will not install unless this feature is enabled in the machine settings itself (while it is powered off):
Pre-installation preparation:
- I went to the machine settings (PDC).
- Navigated to Processor.
- Checked
Enable Nested VT-x/AMD-V.
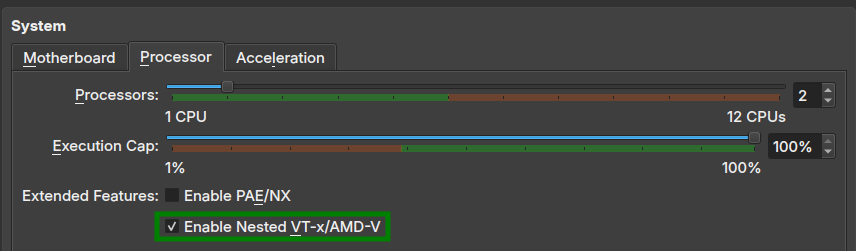 And this is exactly what is required.
This feature allows the server (the VM) to run other Virtual Machines inside it (this is what we call Nested Virtualization).
Step (2): Adding a new Network Adapter:
- In the Network settings in VirtualBox:
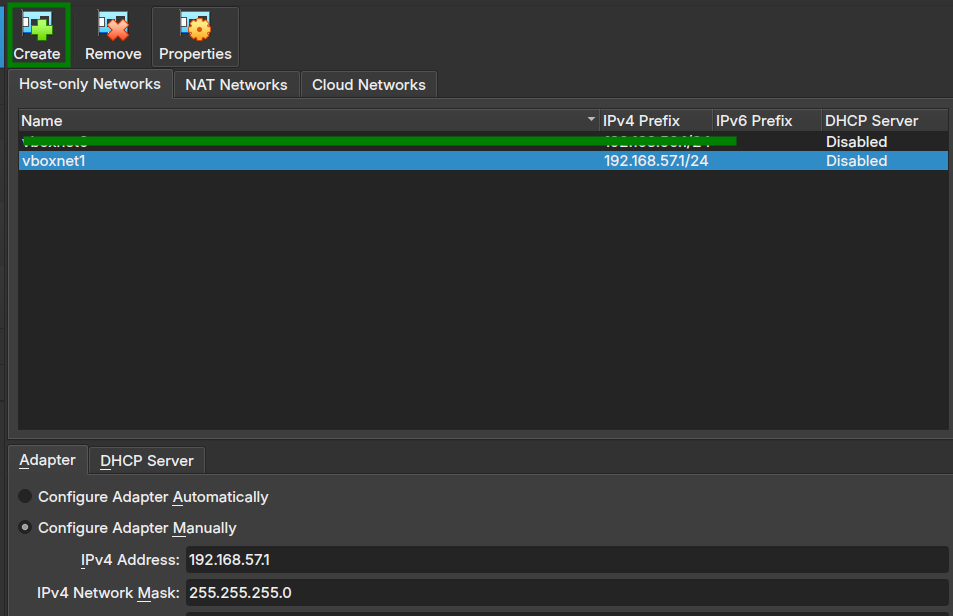
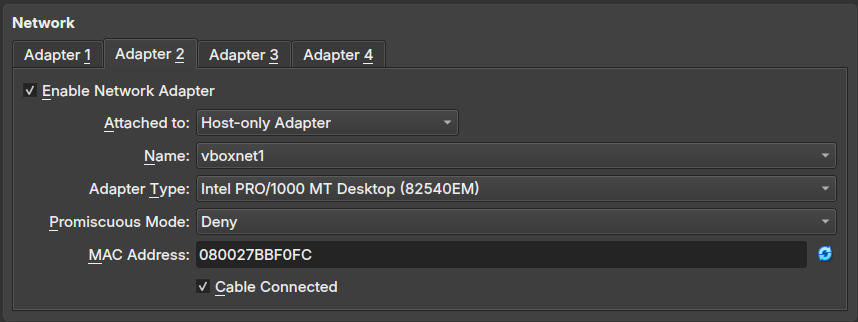
In the VirtualBox settings (on PDC):
- I went to Network -> Adapter 2.
- Selected Host-only Adapter.
- From the dropdown list below, I chose
vboxnet1.
- I started the servers (PDC):
- I opened Network Connections in Windows Server.
- I found a new adapter named
Ethernet 2. - I assigned it a manual IP from the same new range:
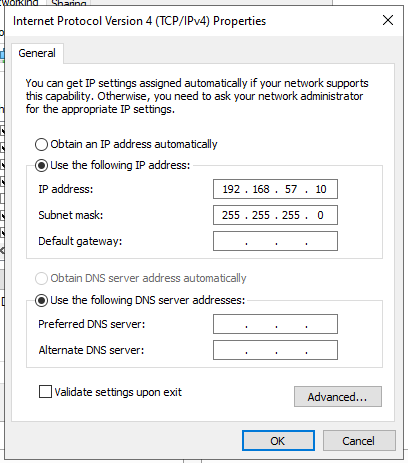
- On the PDC: set it to
192.168.57.10. - Subnet:
255.255.255.0. - DNS and Gateway: I left them empty (because this adapter is internal only for the VMs).
Configuration Note: Hypervisor acceleration set to KVM in VirtualBox to ensure stable nested virtualization on PDC.
Step (3): Installing the Hyper-V Role (on PDC and ADC)
On the server (PDC), I performed the following:
- From Server Manager -> Add Roles and Features.
- Selected Hyper-V.
- In Virtual Switches: selected the available network adapter (the new Host-only adapter).
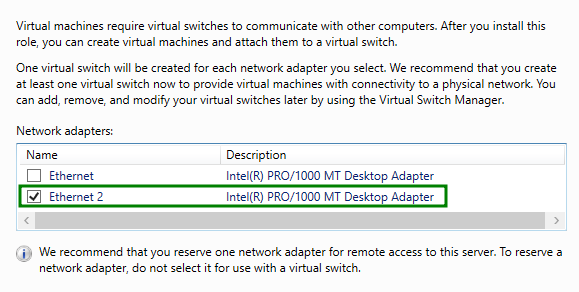
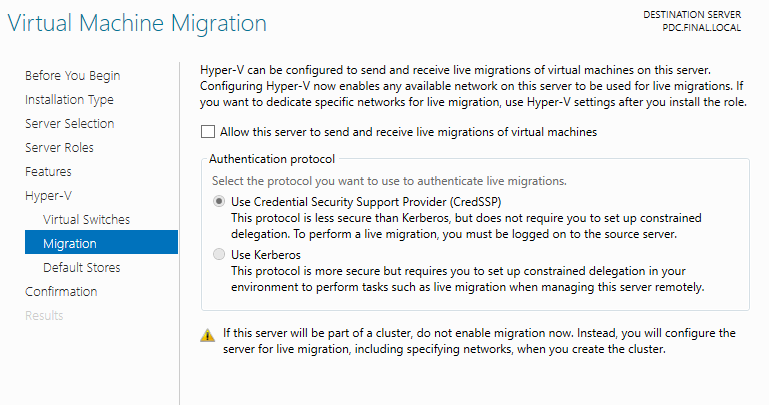 Since we will be using Hyper-V Replica (which we will enable manually from the Settings after installation), we do not need to enable Live Migration at this stage:
- I left the checkbox for "Allow this server to send and receive live migrations..." unchecked.
- Then I clicked Next.
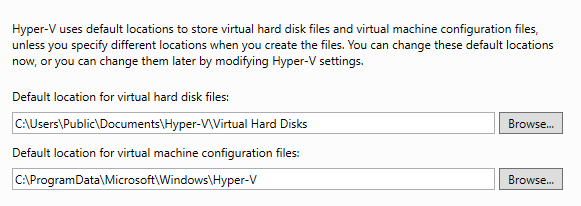
- Clicked Next.
- In the following (Confirmation) screen, checked:
- Restart the destination server automatically.
-
Clicked Install.
-
Completed the wizard and clicked Install.
- Restart: The server will reboot twice to enable the Hypervisor.
Creating the Core VM (Virtual Skeleton)
This step demonstrates to reviewers that virtualization is working properly inside the server:
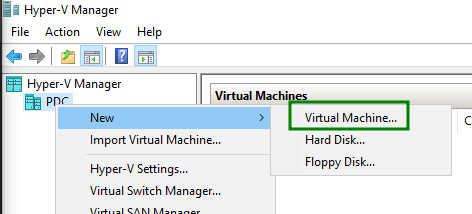
- In Hyper-V Manager, right-click on the server name (PDC) -> New -> Virtual Machine.
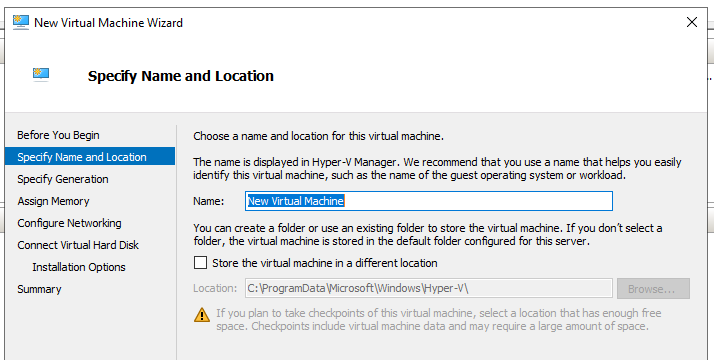
- Name: Name it
Core_VM:
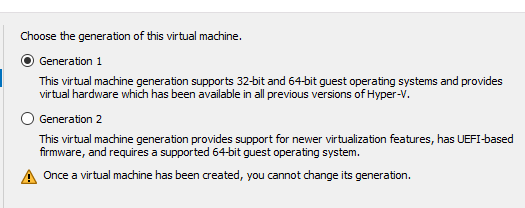
- Generation: Choose Generation 1 (lightest and safest in the labs):
-
Memory: Leave it 512 MB (and remove the check mark from Use Dynamic Memory so that it does not take too much RAM from your device):
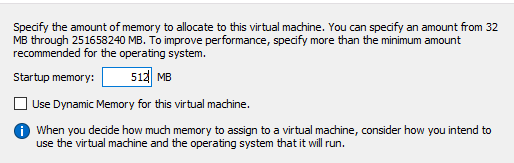
I made sure that the check mark is not there on “Use Dynamic Memory” (exactly as it is in the picture). Reason: We want to fix the RAM consumption so that there is no conflict between Hyper-V and VirtualBox.
-
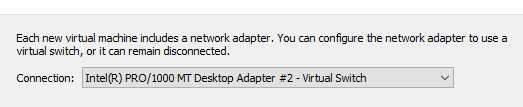
Networking: In the Connection box, choose the Virtual Switch that we made (the one connected to Ethernet 2):
-
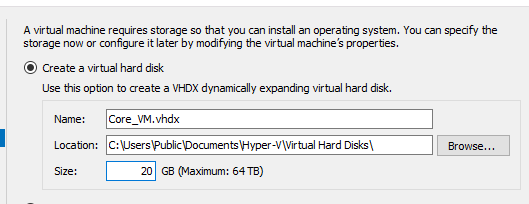
Hard Disk: Leave a small virtual hard disk (for example 20 GB):
-
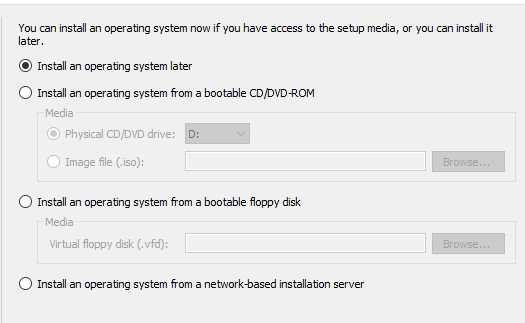
Installation Options: Choose Install an operating system later:
 6. I pressed Finish.
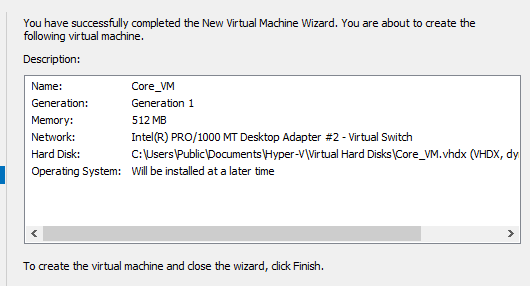

Done .
---
14. Backup Configuration :
The “safety” step ensures that if anything happens to the PDC (crash, virus, or technical mistake), you can restore it exactly as it was with just one click.
Step One: Preparing the “Storage” on the ADC
On the ADC machine, do the following:
- On the C drive (or any available disk), create a new folder named
Backups. - Right-click the folder -> Properties -> Sharing -> Advanced Sharing.
- Check Share this folder.
- Click Permissions:
- Give Everyone Full Control.
- (This ensures the PDC can write to it without any “Permissions” issues).
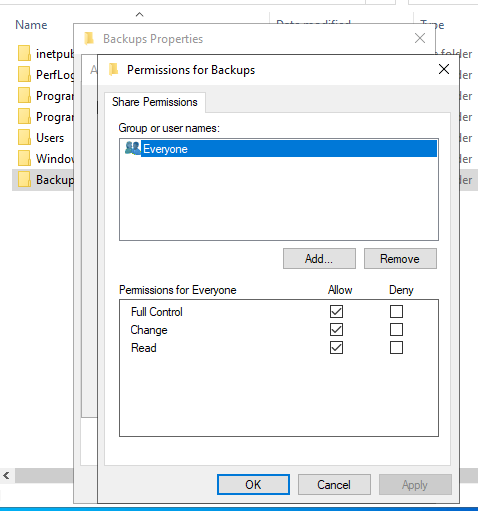
- I pressed OK in all screens.
Step Two: Installing the Backup Feature on the PDC
On the PDC machine, do the following:
- Open Server Manager -> Add Roles and Features.
- Click Next until you reach the Features page (not the Roles page).
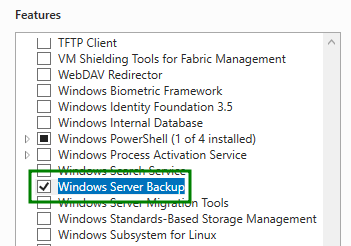 3. I downloaded it completely and correctly on
 Windows Server Backup.
- Press Install (this is very light and will not require a restart).
Step Three: Scheduling the Backup
While still on the PDC:
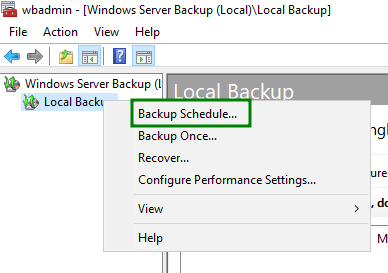
- Open Server Manager -> Tools -> Windows Server Backup.
- On the right-hand side (Actions), click Backup Schedule....
-
In the Wizard:
-
Select Backup Configuration: Select Full Server (recommended):
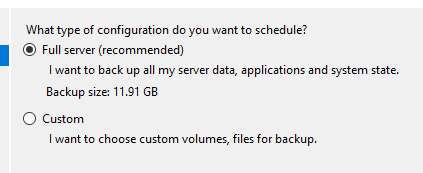
- Specify Backup Time: Choose Once a day and set the time to 11:00 PM:
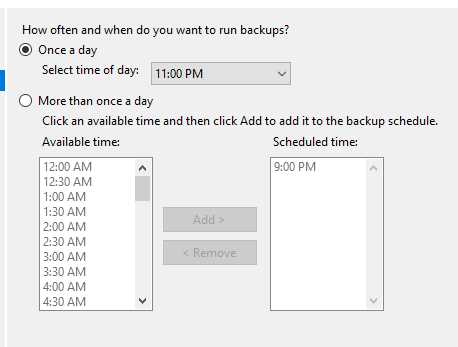
- Specify Destination Type: Choose Back up to a shared network folder. (You will receive a Dos OK warning message):
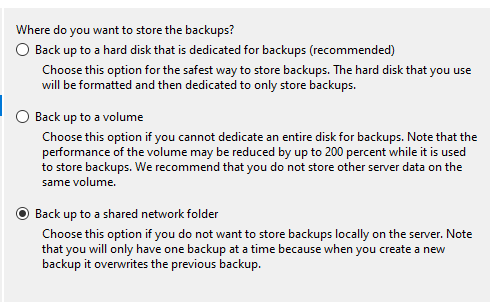
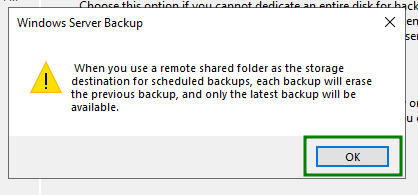
- Location: Type the ADC path:
\\192.168.56.11\Backups(or the server name\\ADC\Backups).
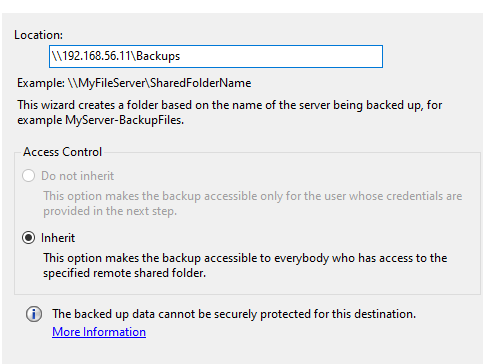
- Access Control: You will be asked for a user and password. Enter the information for the Administrator of the domain.
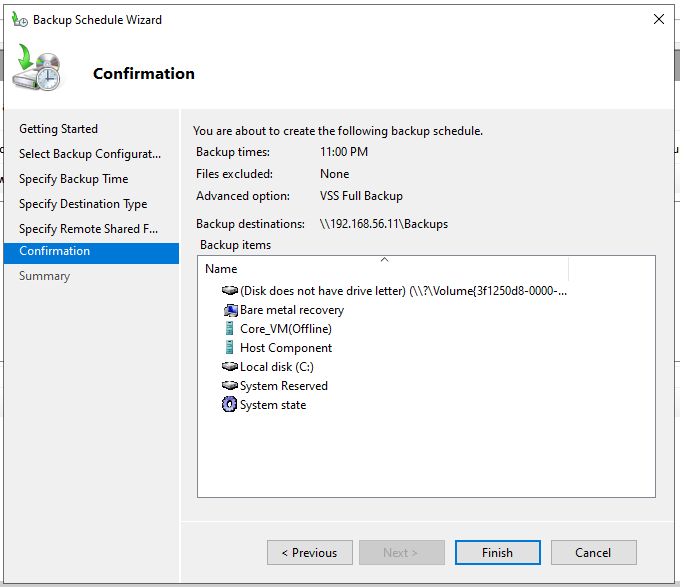
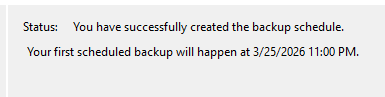
It will start preparing the schedule (Creating Backup Schedule), and then it will show you a message that the process was completed successfully.
---
🖥️ 15. Client Configuration and Connection Verification
1. Verifying the IP Settings (DHCP Service):
- Action: The client machine (Windows 10) was connected to the internal network.
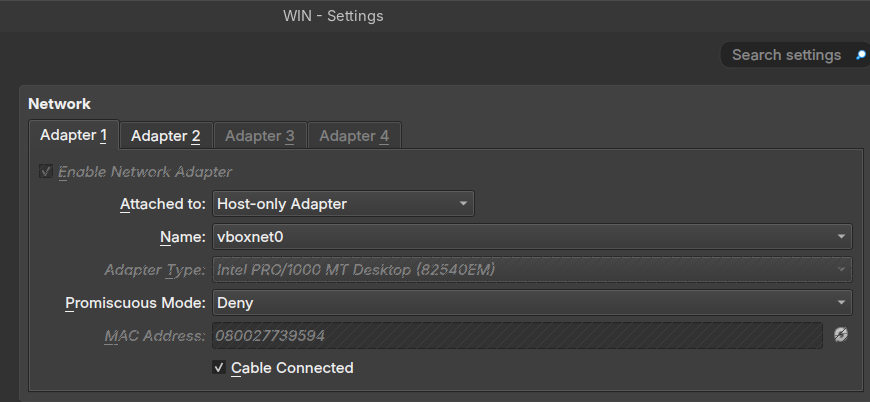
- Result: The device successfully obtained an IP address automatically (192.168.56.138) from the DHCP Scope previously configured on the PDC.
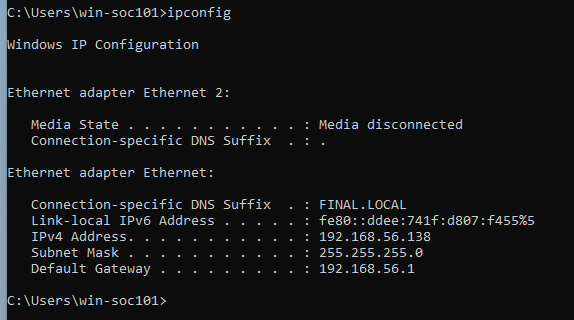
The domain name was automatically assigned as
FINAL.LOCAL, confirming that the DHCP options (Option 006) successfully distributed the correct DNS addresses.
2. DNS Connectivity Test:
- Test: A connectivity test was performed using the
ping final.localcommand from the CMD.
C:\Users\win-soc101>ping final.local

Pinging final.local [192.168.56.11] with 32 bytes of data:
Reply from 192.168.56.11: bytes=32 time<1ms TTL=128
Reply from 192.168.56.11: bytes=32 time=1ms TTL=128
Reply from 192.168.56.11: bytes=32 time<1ms TTL=128
Reply from 192.168.56.11: bytes=32 time<1ms TTL=128

Ping statistics for 192.168.56.11:
    Packets: Sent = 4, Received = 4, Lost = 0 (0% loss),
Approximate round trip times in milli-seconds:
    Minimum = 0ms, Maximum = 1ms, Average = 0ms

C:\Users\win-soc101>
A successful reply was received from the primary server (192.168.56.10), confirming that the DNS service is working and directing devices to the domain correctly.
3. Joining the Domain:
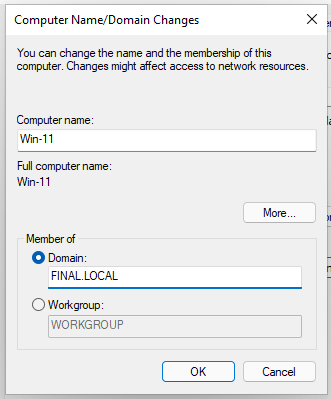
- Action: The machine’s membership was changed from a Workgroup to the Domain
FINAL.LOCAL. - Authentication: The domain administrator account (Administrator) credentials were entered to authorize the join.
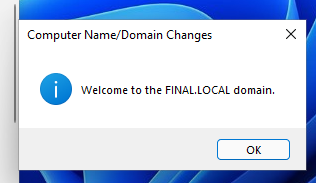
A welcome message appeared: "Welcome to the FINAL.LOCAL domain".
After that, a regular user logged in and ran:
gpupdate /force
This forced the client to immediately pull all security settings, permissions, and shared folders configured on the PDC.